Overview
The Model registry allows Users to register models into the platform so that they can be used in downstream processes such as Policy writing and performance reporting. Any Model regardless of whether it was built within the platform using the Notebook or the Guided Flow (datasets and experiments) or outside the platform using external modeling tools can be registered for use within the platform
Where is this done?
Models can be registered in Model Studio module.
Registering a Model
-
To register a model click on the Model Registry tab within the Model Studio application
-
Click on Create button on the top right corner of the application
- Models already registered on the Platform can be searched by the keywords or can be filtered by the Status and Type of model

-
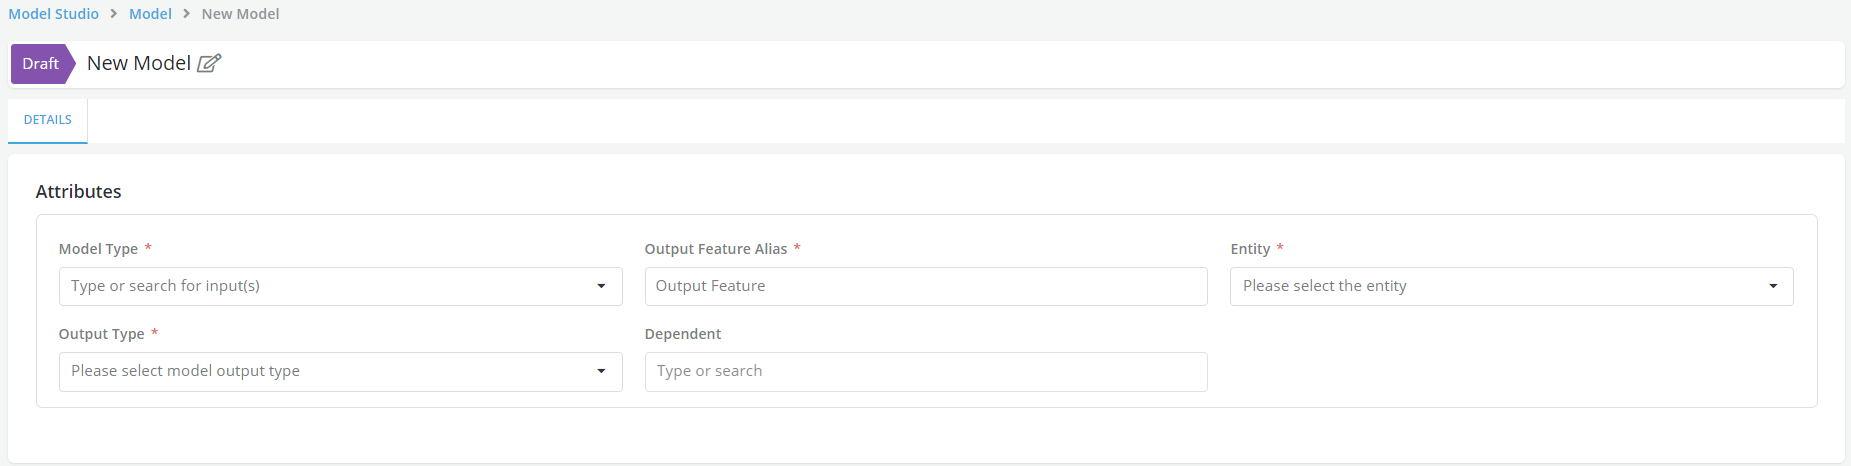
A Model Details page will be displayed, enter all the information about their model including the actual model code:
-
Model Name: Enter the name of the model in a free format
-
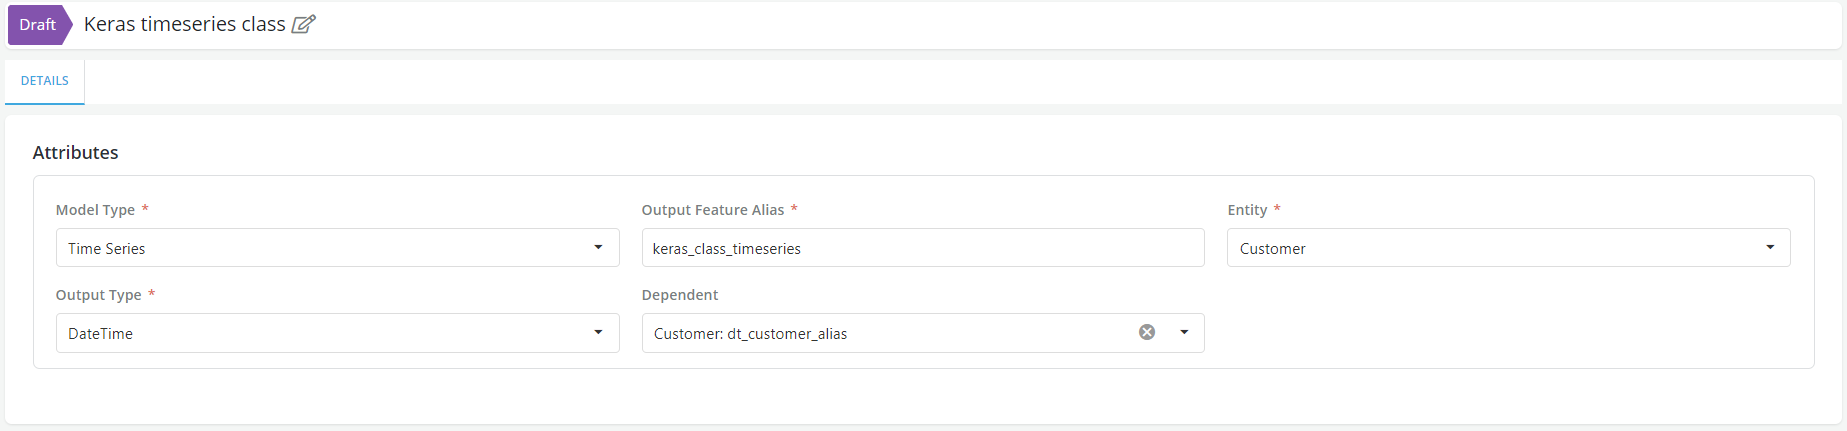
Model Type: Select the type of the model to register (Time series, Binary classification etc.)
-
Output Feature Alias: The name of the model output variable.
-
Entity:Select the entity for the model to register. The entities that the system currently recognizes are prospects, applications, loans, and customers.
-
Output Type: Select the Output type from the dropdown.
-
Dependent: The name of the dependent variable that the model will be trying to predict (Note: Definition of the dependent variables may include Global Variable or Product type config)
-
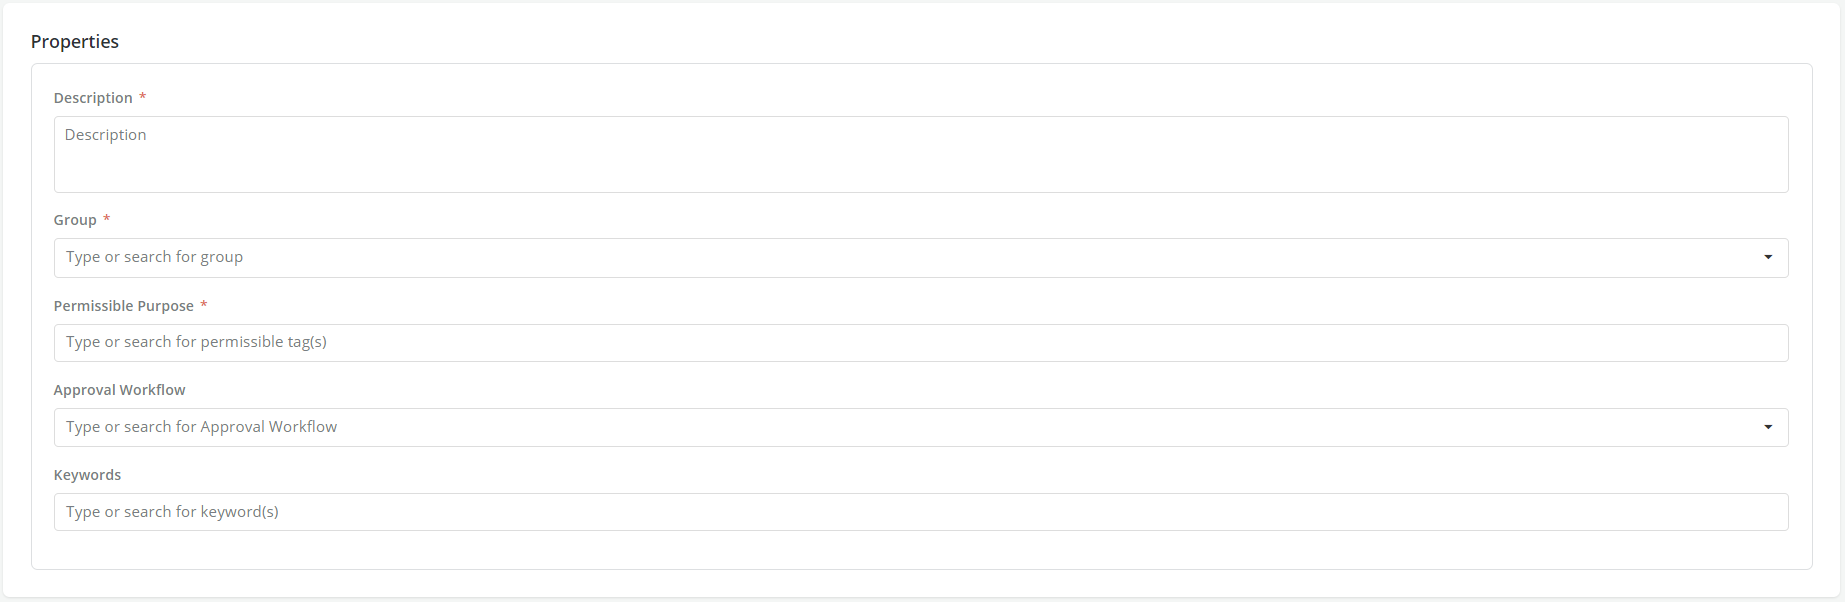
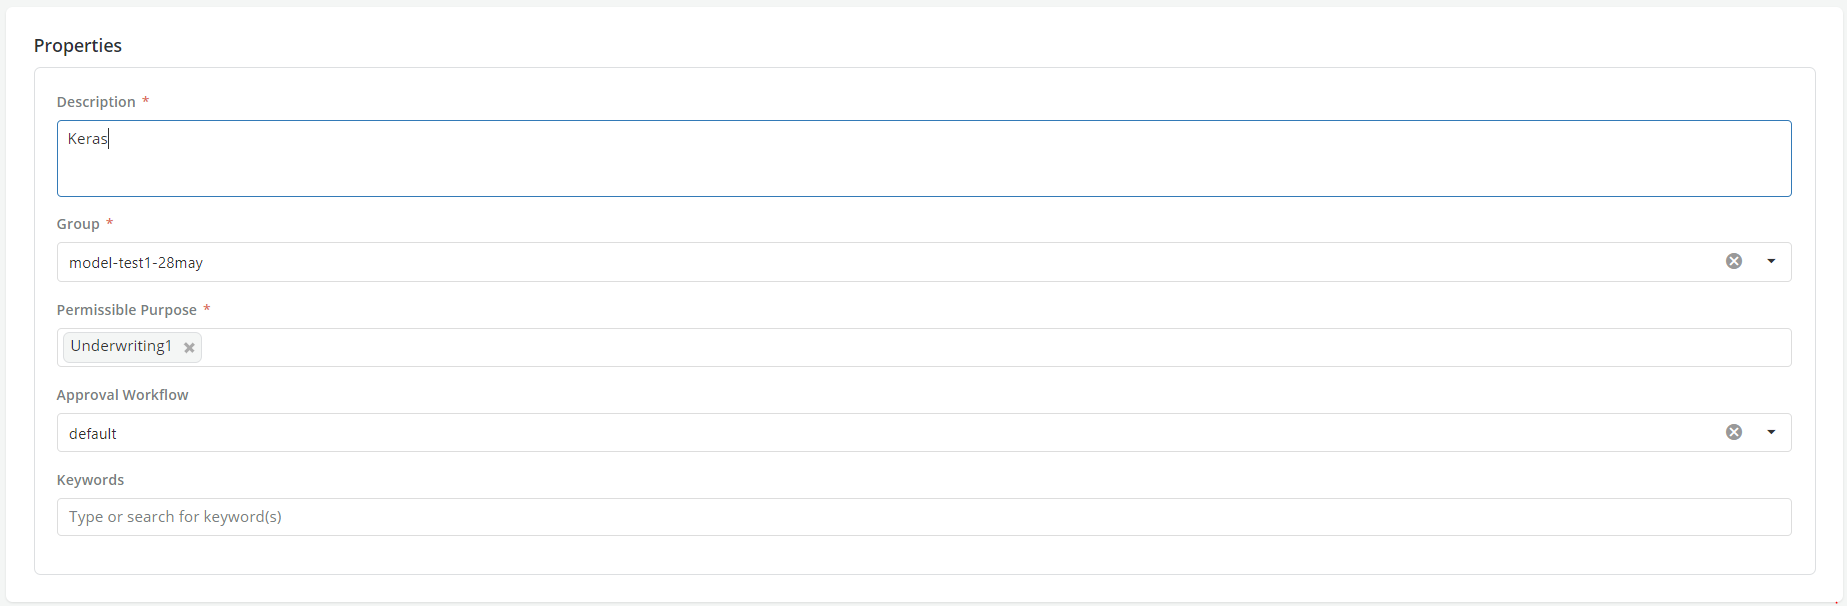
Description: A free format description of the model for documentation purposes.
-
Group:.The group that user wants to allocate the model to (e.g. Default models, Revolve models, etc.)
-
Permissible purpose:The purpose for which the model can be used (e.g., Underwriting or Prospecting). These permissible purposes will be tracked across the platform. If a model is registered and later on used for a purpose other than its permissible purpose(s) the lineage will display red flags.
-
Approval Workflow: An Approval Workflow is a set of users who collectively review and approve new objects of a certain type being registered in the platform.
-
Keywords:An example of a Keyword can be a word that expresses where the model will be used (modeling) or where the data comes from (Self-Reported) etc.
-
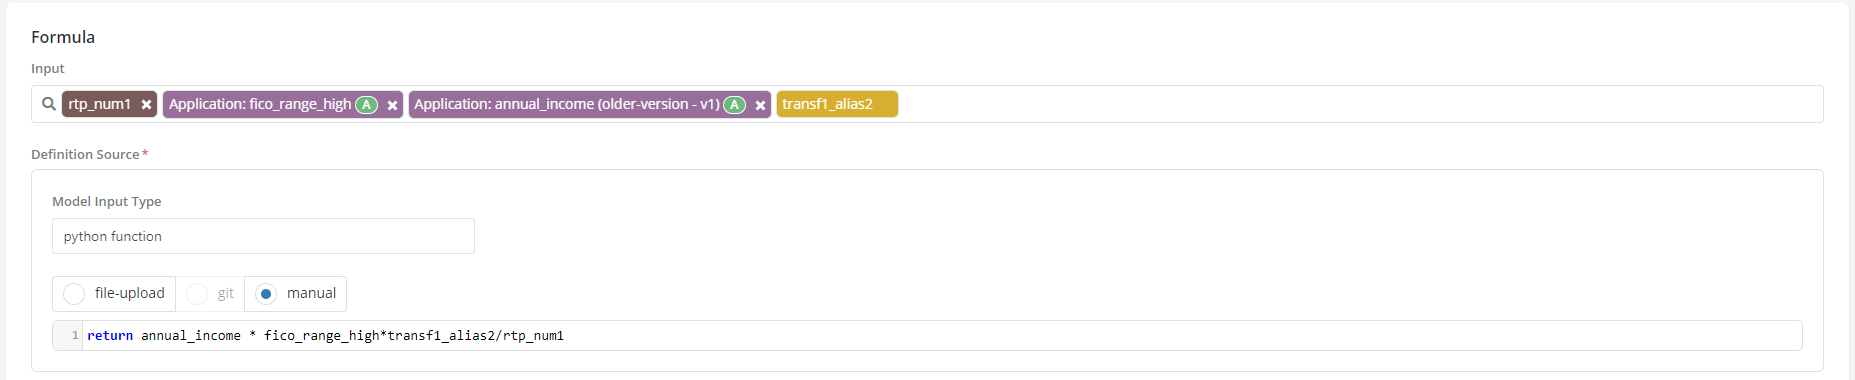
Input: These inputs can only be data elements and features that have been registered on the Platform. Only the latest active version of each feature or data element will be available for input to a model. A User can search and select as many fields as needed from the list of available features and data elements that appear when they click on the Input box (features are highlighted in green while data elements are in purple color)
-
Model Definition (Model Input Types): Models can be registered in the platforms in the following five different formats .
- PMML
- Pickle
- H2o Mojo (Including driverless AI)
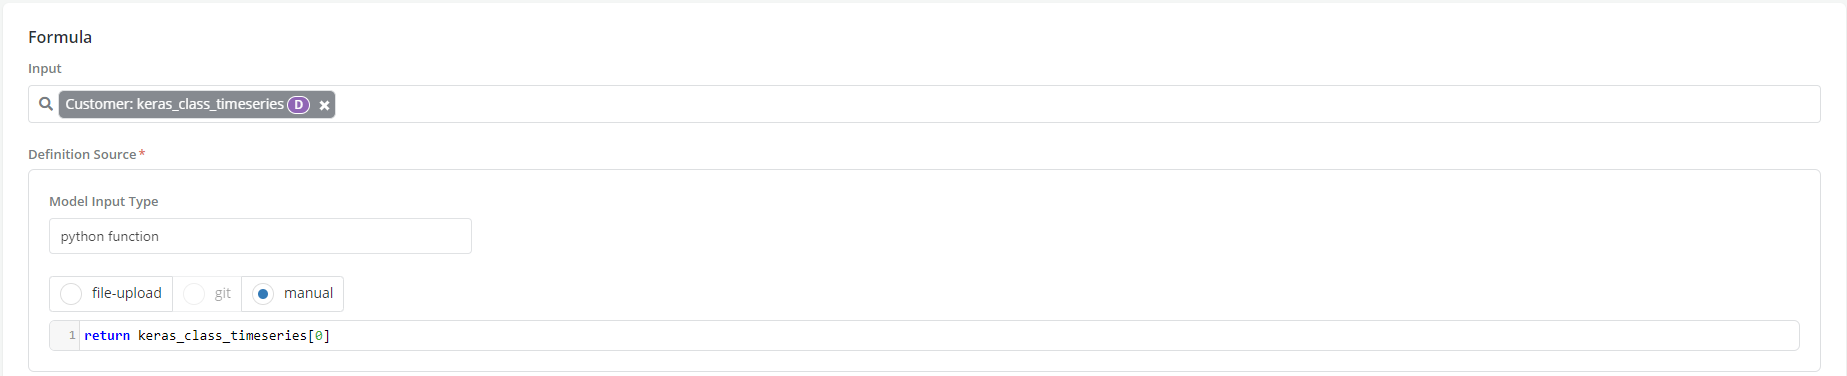
- Python Function
- Onnx
- Lookup
Registering a model depending on its format
Models can be registered in the platforms in the following five different formats.
-
PMML
-
Pickle
-
H2o Mojo (Including driverless AI)
-
Python Function
-
Onnx
-
Lookup
Pmml
- Upload the PMML file
- Specify the Output fields:
- Probability of one of the dependent classes for Classifiers
- Predicted value of dependent for Regressions
- Click on test syntax to verify that all inputs are declared and match with the uploaded file’s expected input
- Correct any identified input mismatch by adding or removing the related fields in or from the input box

Pickle/ H2O Mojo / Python
- Upload file
- Click on test syntax to verify that all inputs are declared and match with the uploaded file’s expected input
- Correct any identified input mismatch by adding or removing the related fields in or from the input box.
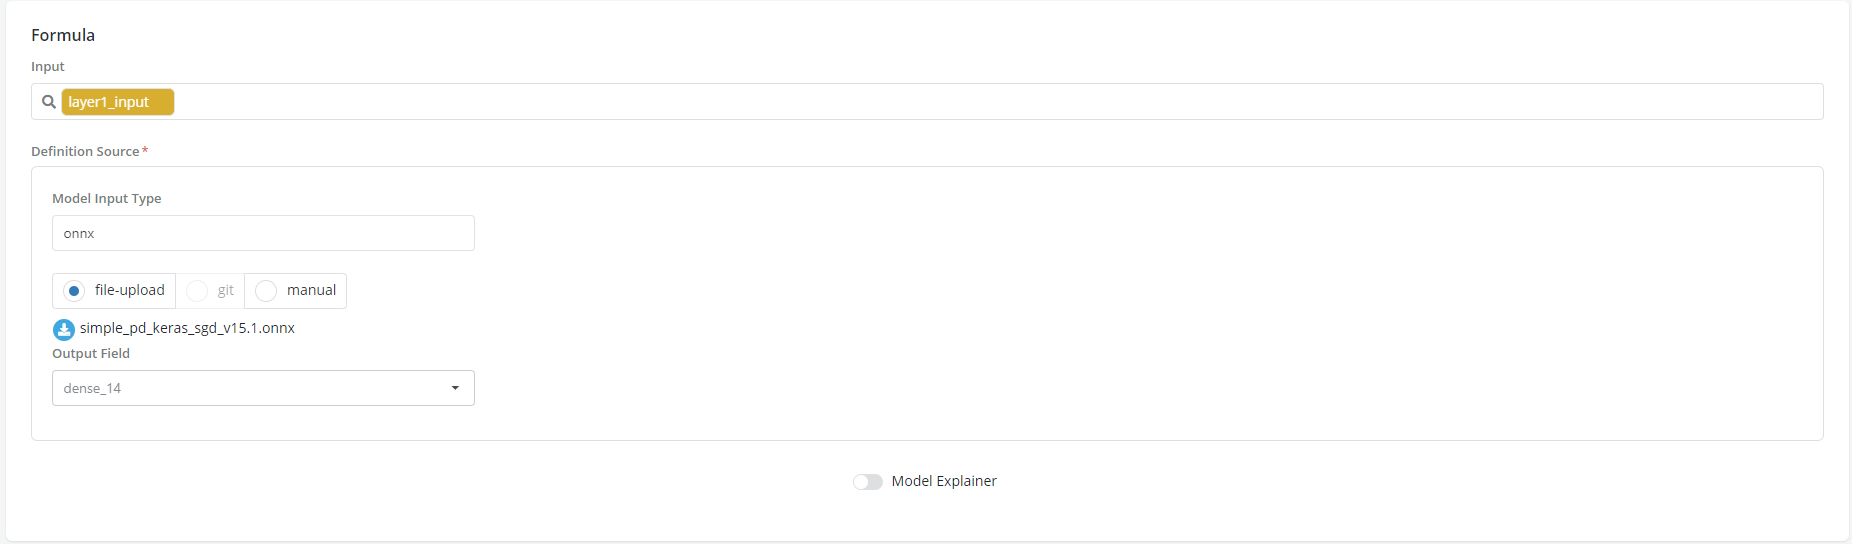
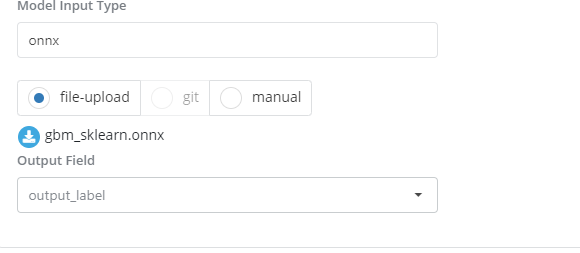
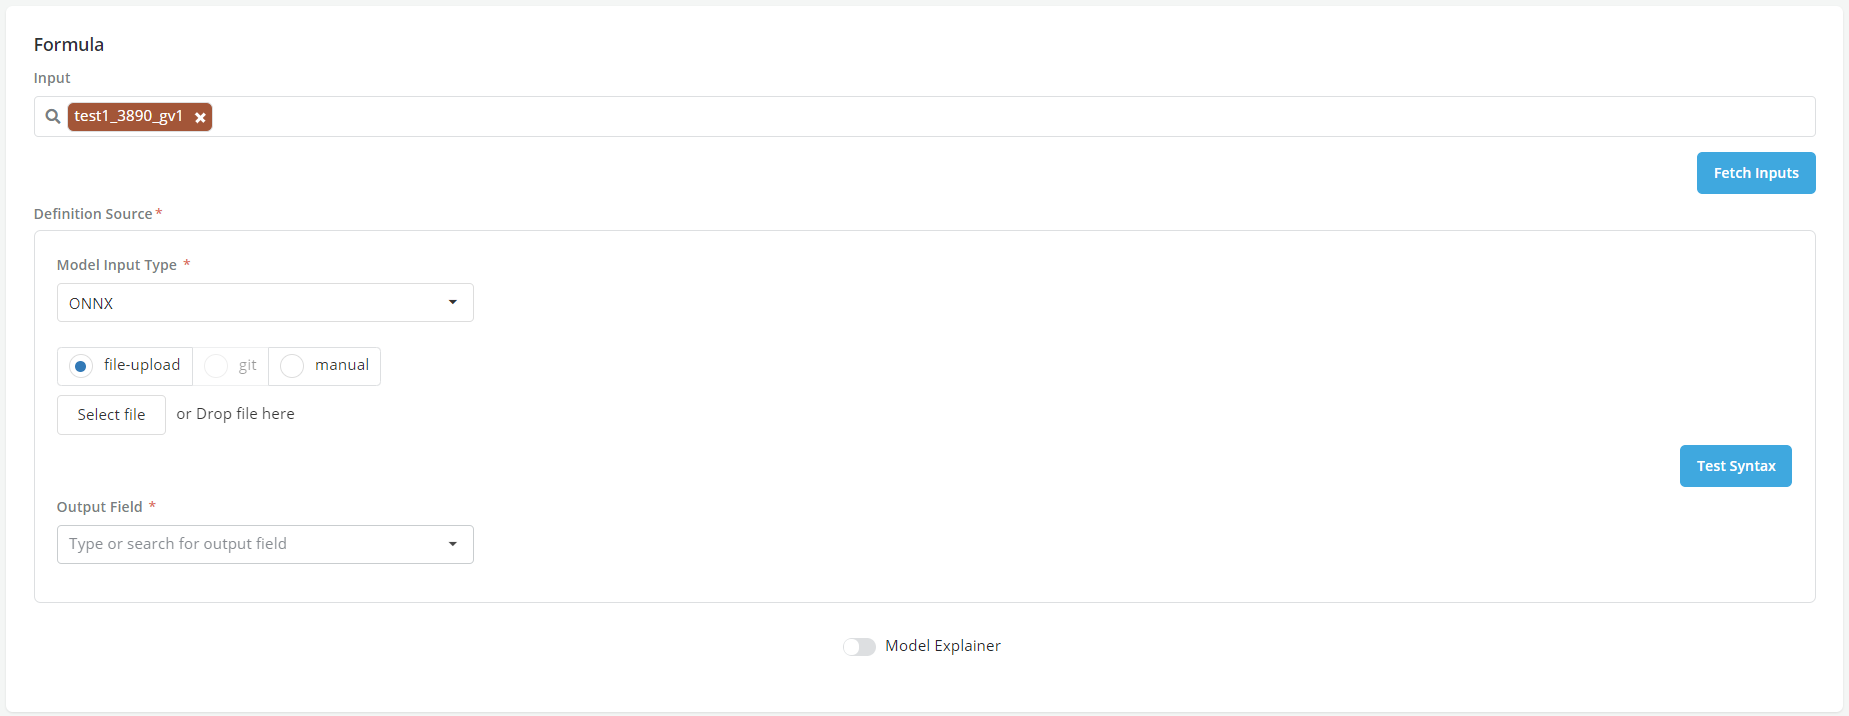
Onnx - Deep learning frameworks (e.g., Keras)
-
Currently two registrations are necessary in order to use an Onnx type model in corridor
-
Raw Onnx model registration
-
Create a new model (M1)
-
Assign it a type = Time series (this will allow the output to be in an array format which is the expected behavior from Onnx models)
-
Upload file
-
Click on test syntax to verify that all inputs are declared and match with the uploaded file’s expected input
-
Correct any identified input mismatch by adding or removing the related fields in or from the input box
-
In the snapshot below, output field is populated by the final layer used during the model build.
-
Registration of the Onnx output reader
-
Register another model (M2) which reads the model (M1) above as an input and returns the first element of the output array .
- In the snapshot below the classifier takes the array o/p from the model above and returns the first occurrence as the probability
Onnx - Scikit-learn models
- In this case the output field is always a class instead of the probability
Lookup
In many cases users put their models in the format of a lookup table where each cell is a condition and if a record satisfies all the conditions of a given cell then the model's output value is a value stored in the "Output" column.
The lookup capability gives users the option to upload directly a csv file as a lookup table. * Import the csv file
-
Click on test syntax to verify that all inputs are declared and match with the uploaded file’s expected input
-
Correct any identified input mismatch by adding or removing the related fields in or from the input box
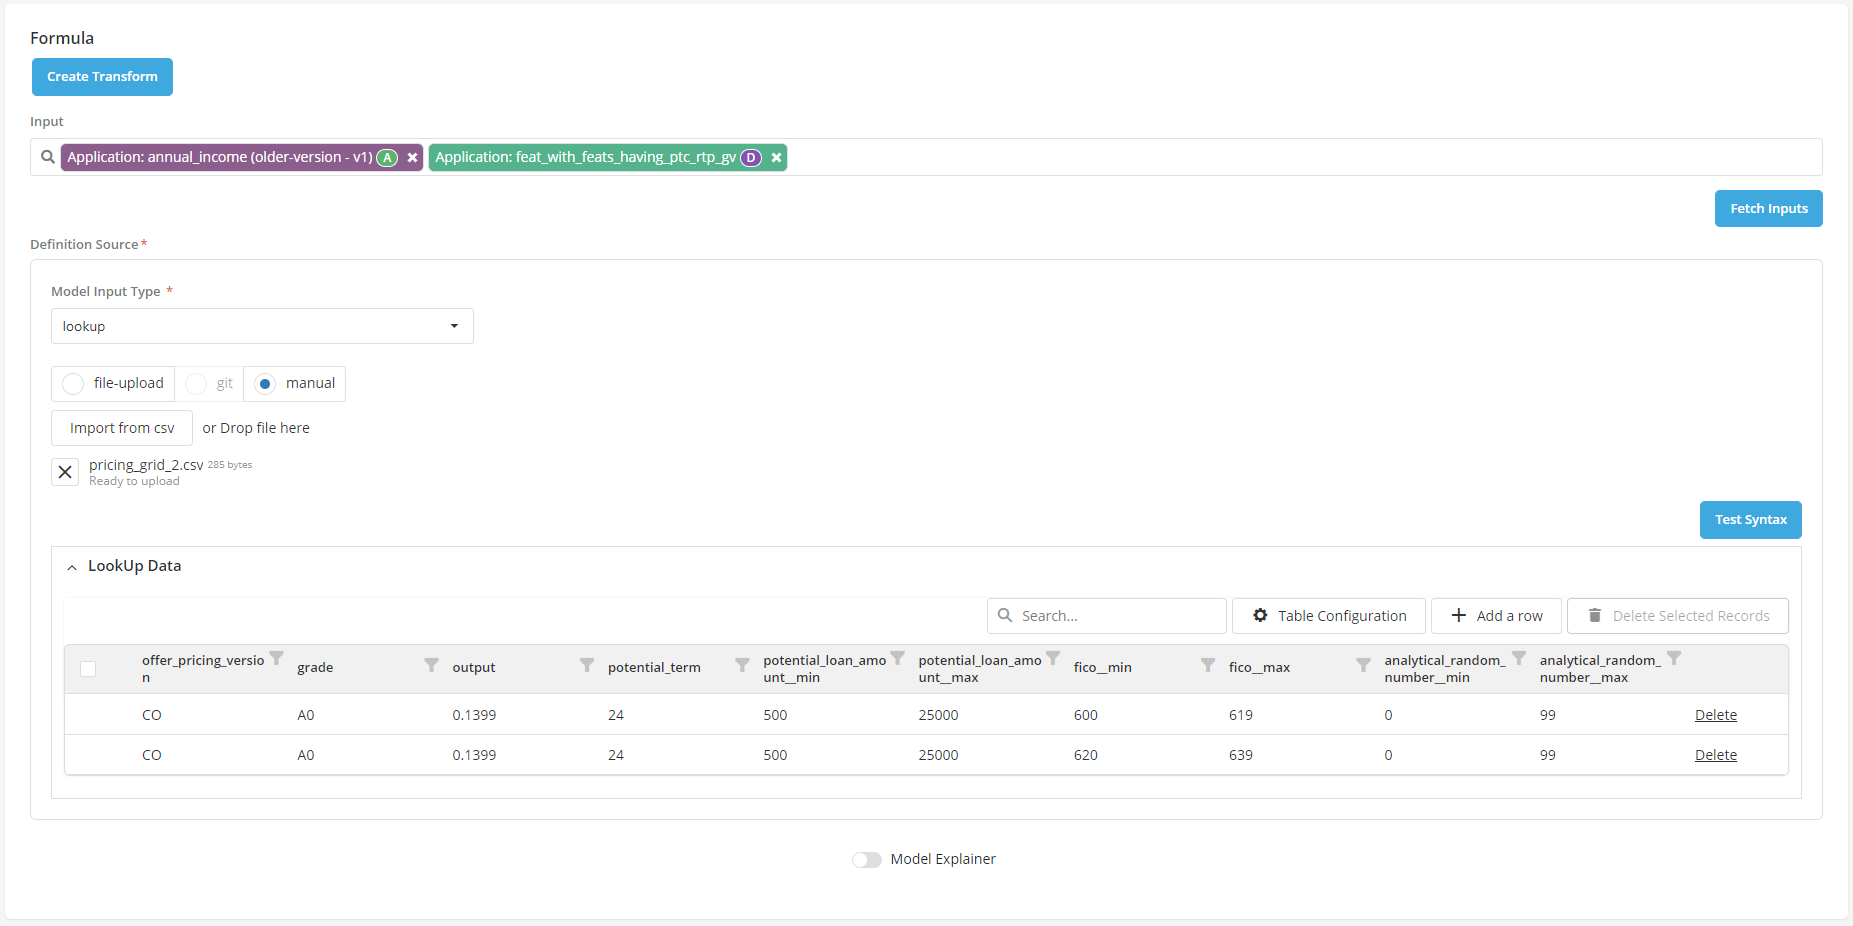
Once uploaded, Users can further visualize the table and make edits to it within the registry page:
-
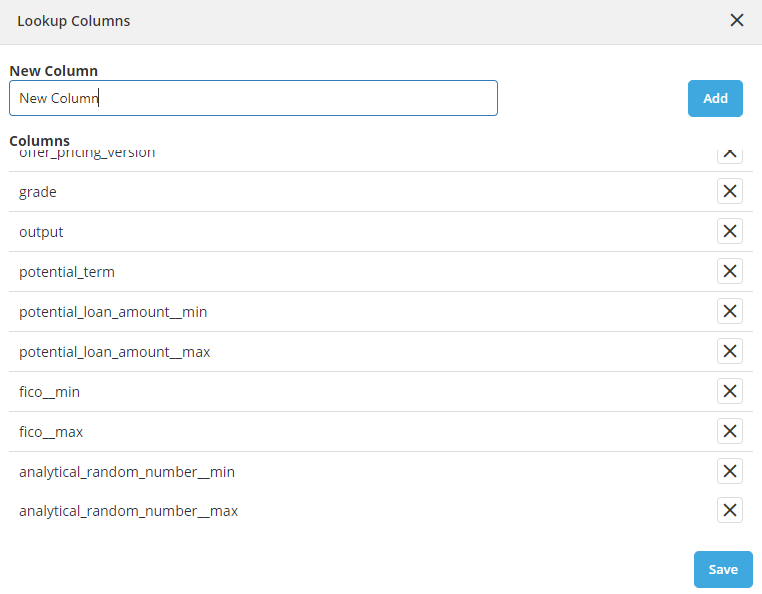
To add a column in the table click on Table Configuration button
-
Enter the name of the New Column and click on Add
-
Scroll down the list in the form, newly created column should appear in the list
-
Click on Save
-
Once the columns are added, record can be added to the columns
- To add a new row, click on Add Row button
- Enter the value for each column in the row
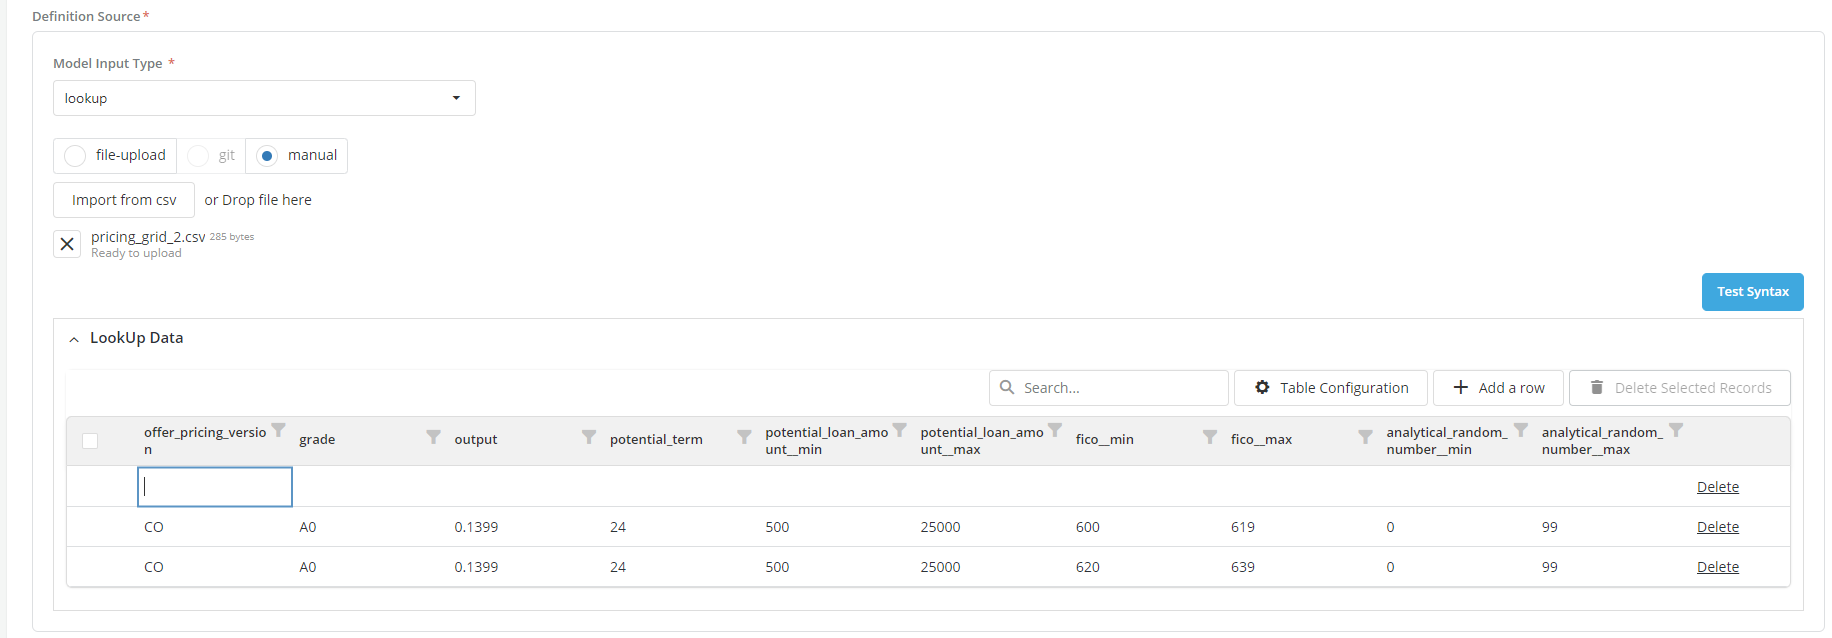
- To delete the row/records, select the row and click on Delete Selected Records button

Running jobs on models
Once a model has been created users can run the following jobs on it
Model groups are set up in Administrative Settings. They are mainly used to organize information and facilitate search. Group allocation does not currently impact the way a model is used except during comparison with another model (only models of the same group can be compared)
Example for registering a model
Here is the example of registering a Onnx Model.
Step 1: Register the model as timeseries.
Step 2: Register a Binary classification model and record the time series model registered in step 1 as Input.
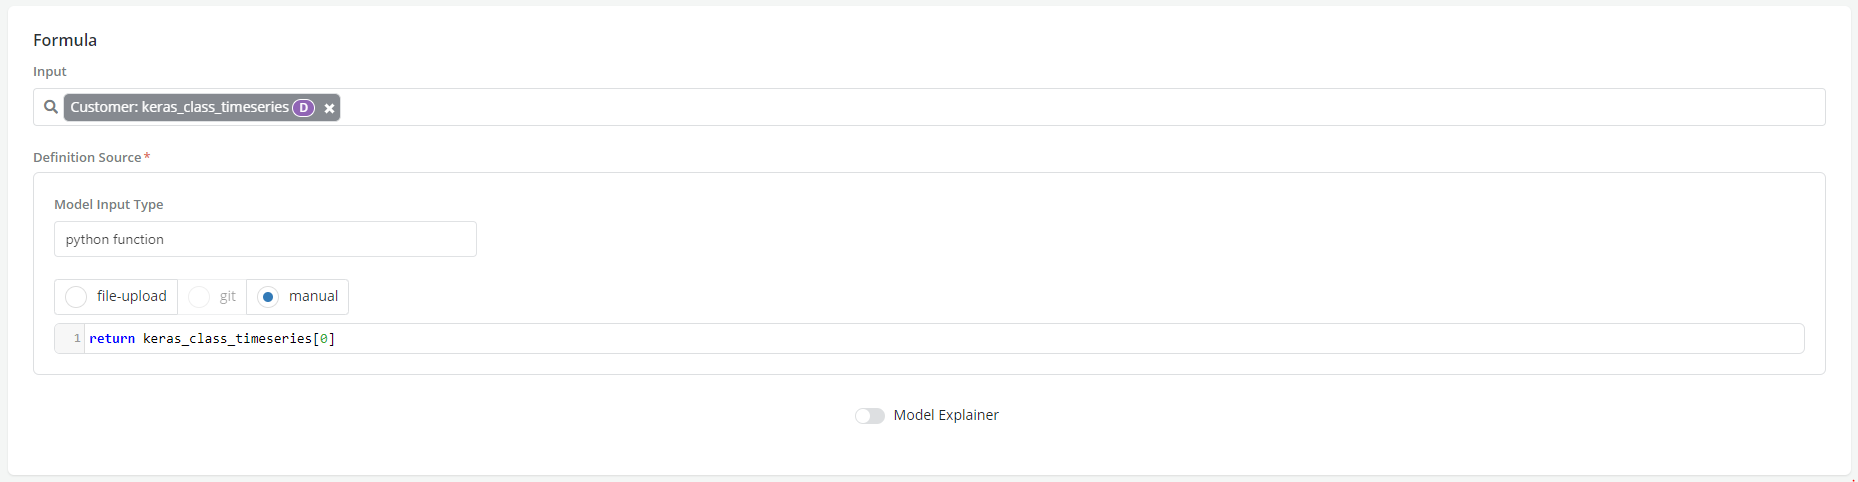
- See Definition (Formula) for more details on how to write model definitions.
- Enable/disable the Model Explainer as appropriate
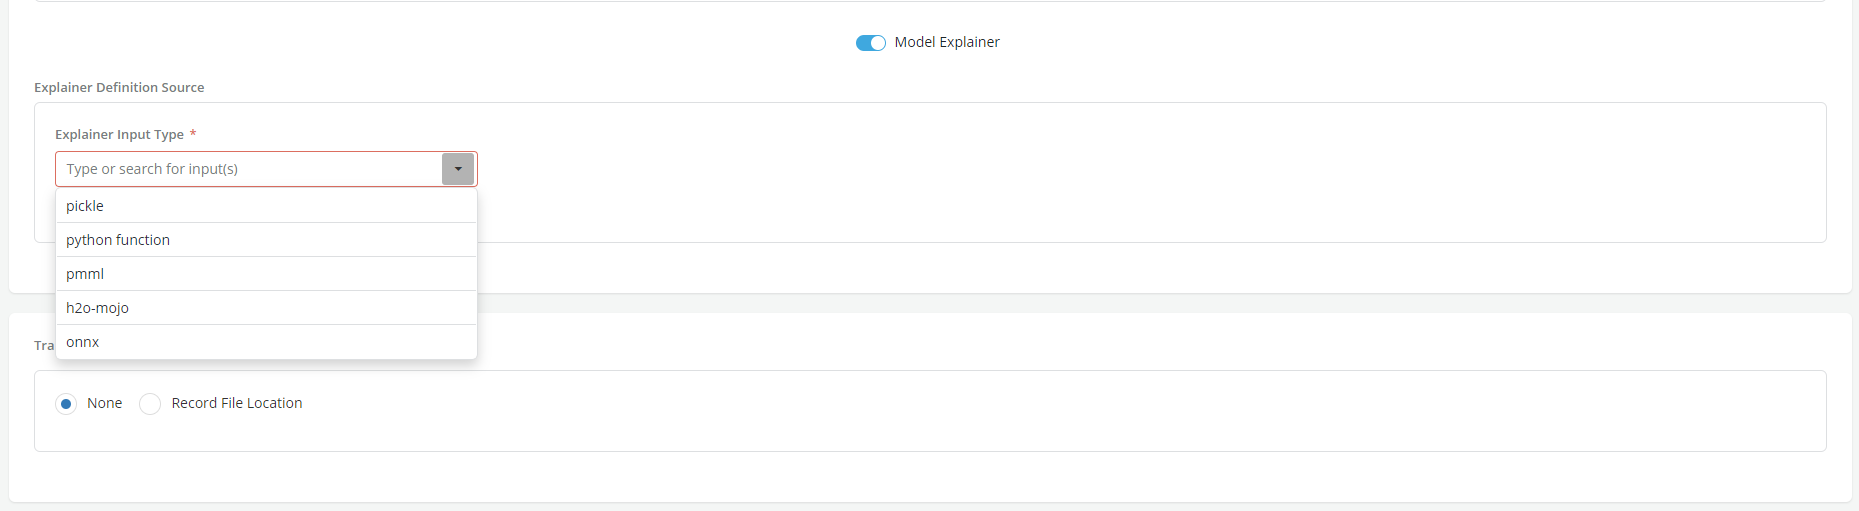
- There are other options for adding Training and Validation information
- None - This implies that no training or validation dataset information will be provided

- Record File Location: Specify the file location. Multiple locations can be added. The files' location should be in the data lake that the platform is reading from.
- Click on Add
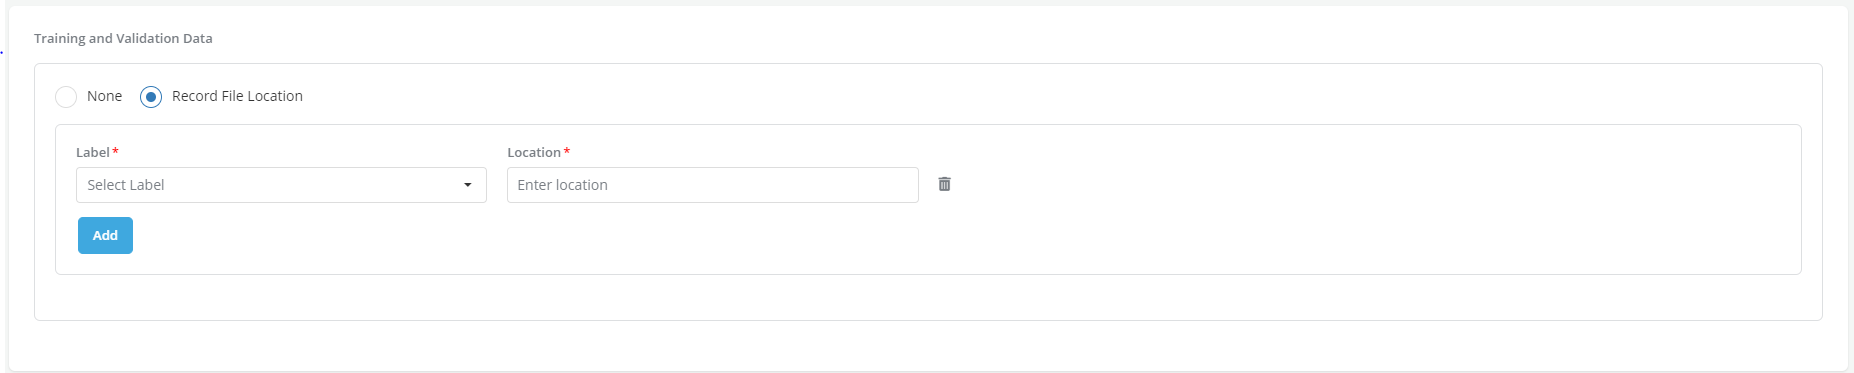
Additional information related to the model can be provided in a free flow format, that will be presented to the approver. This includes adding information about the training and validation samples used to develop the model * Click on Create

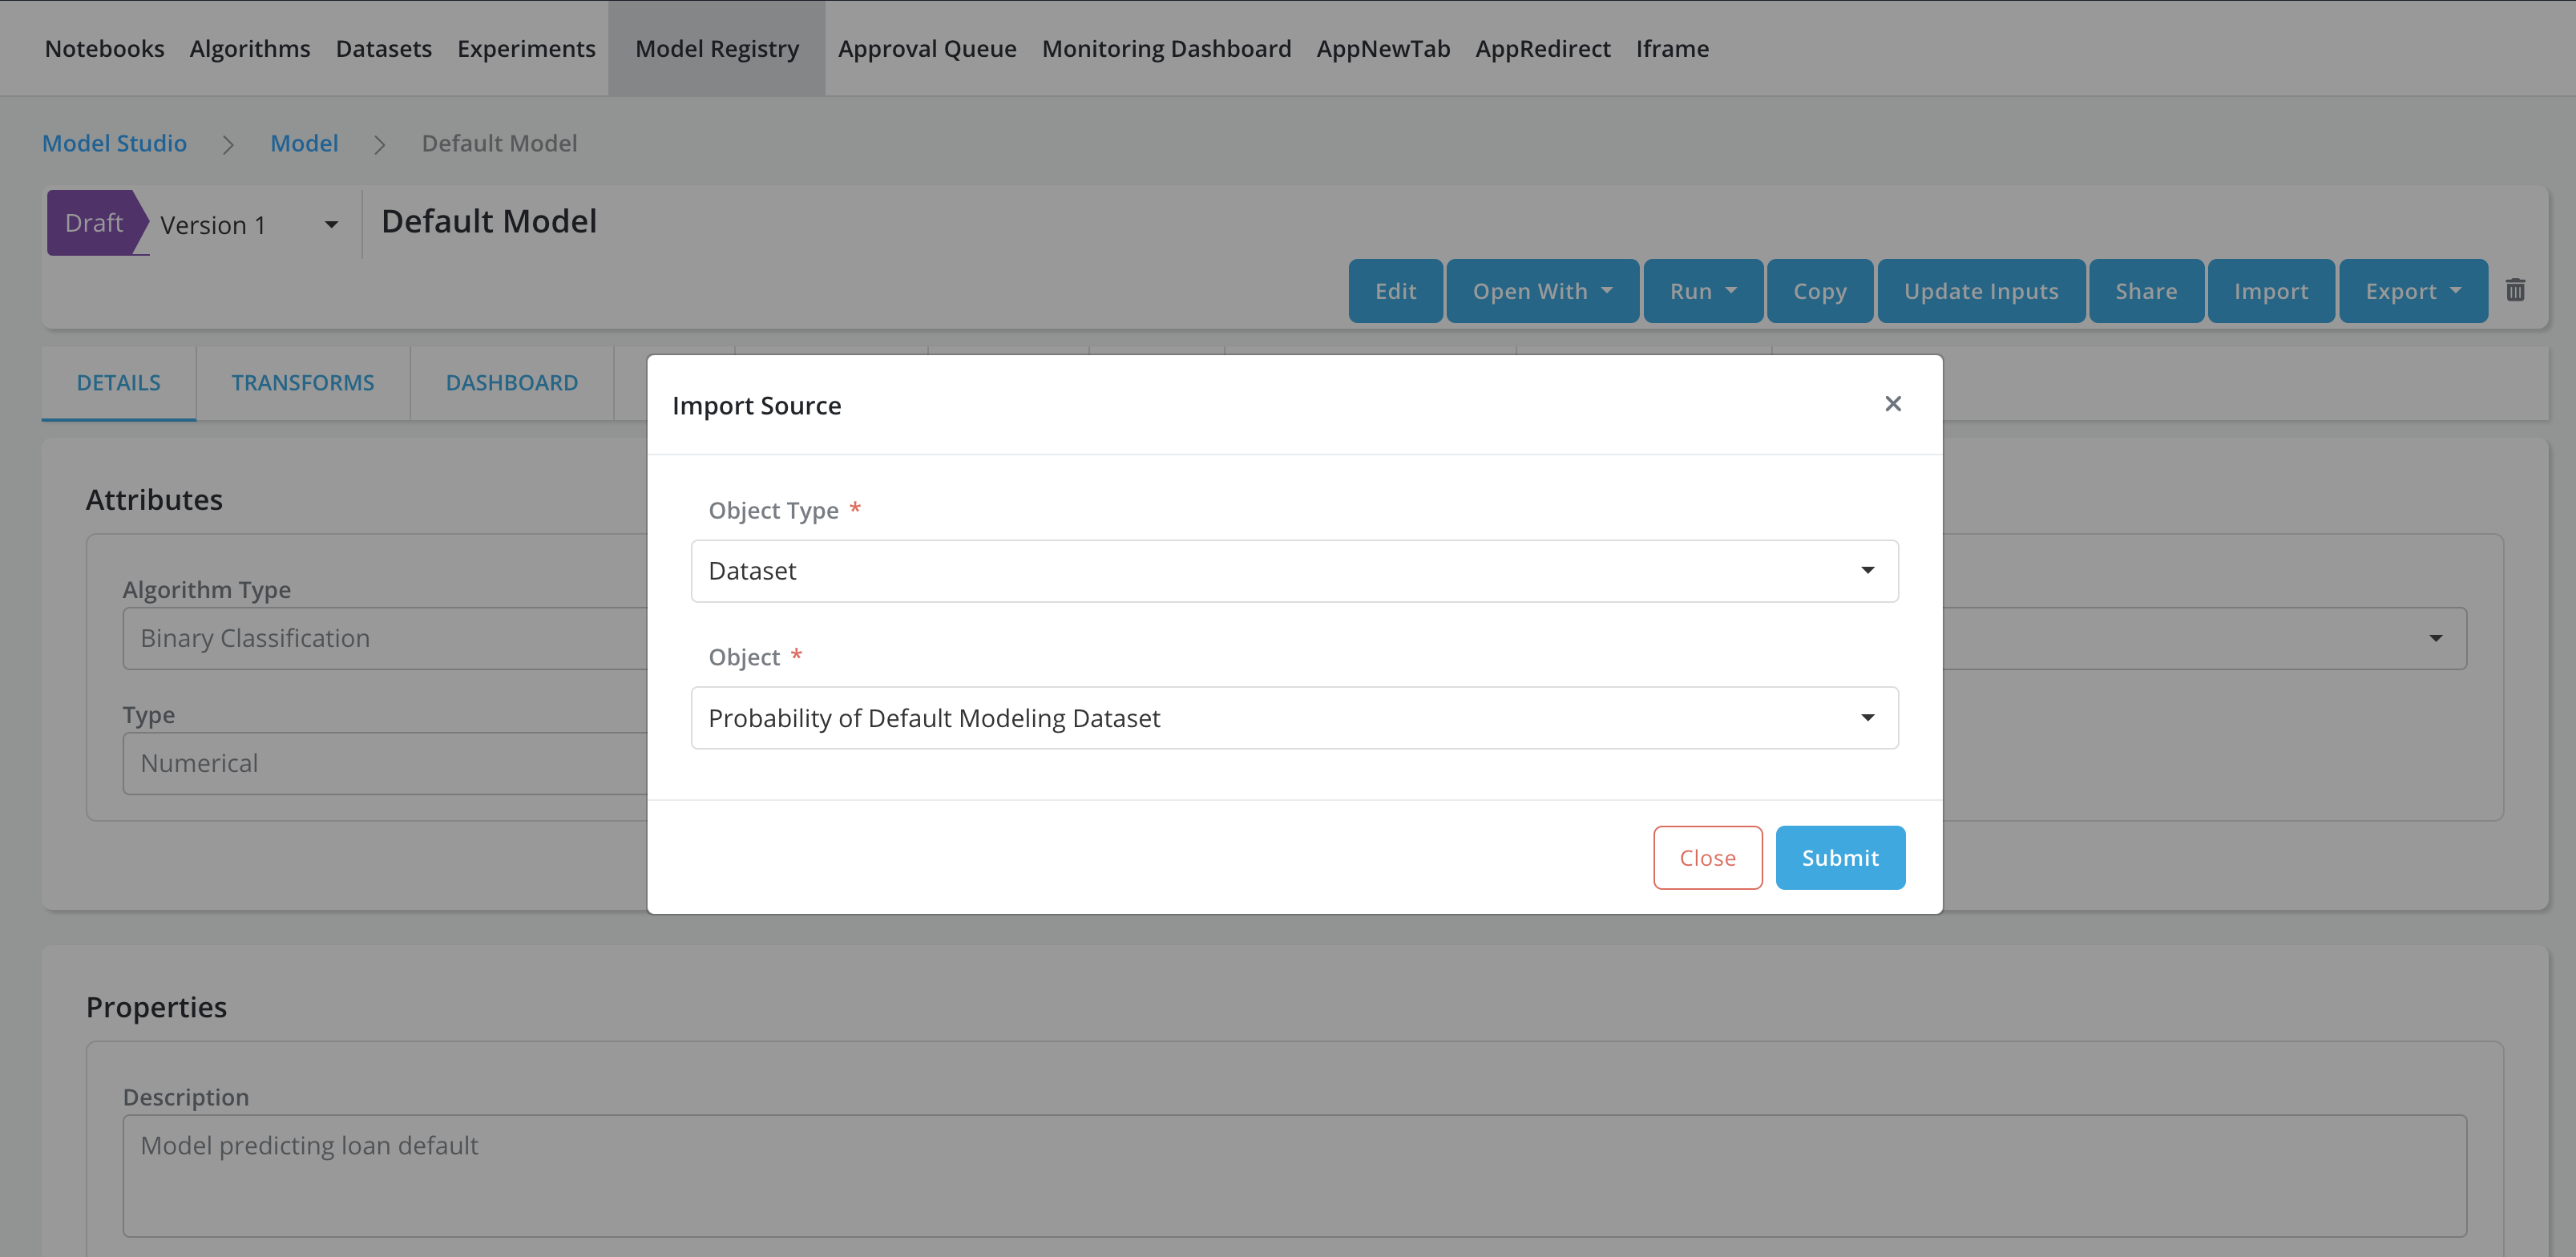
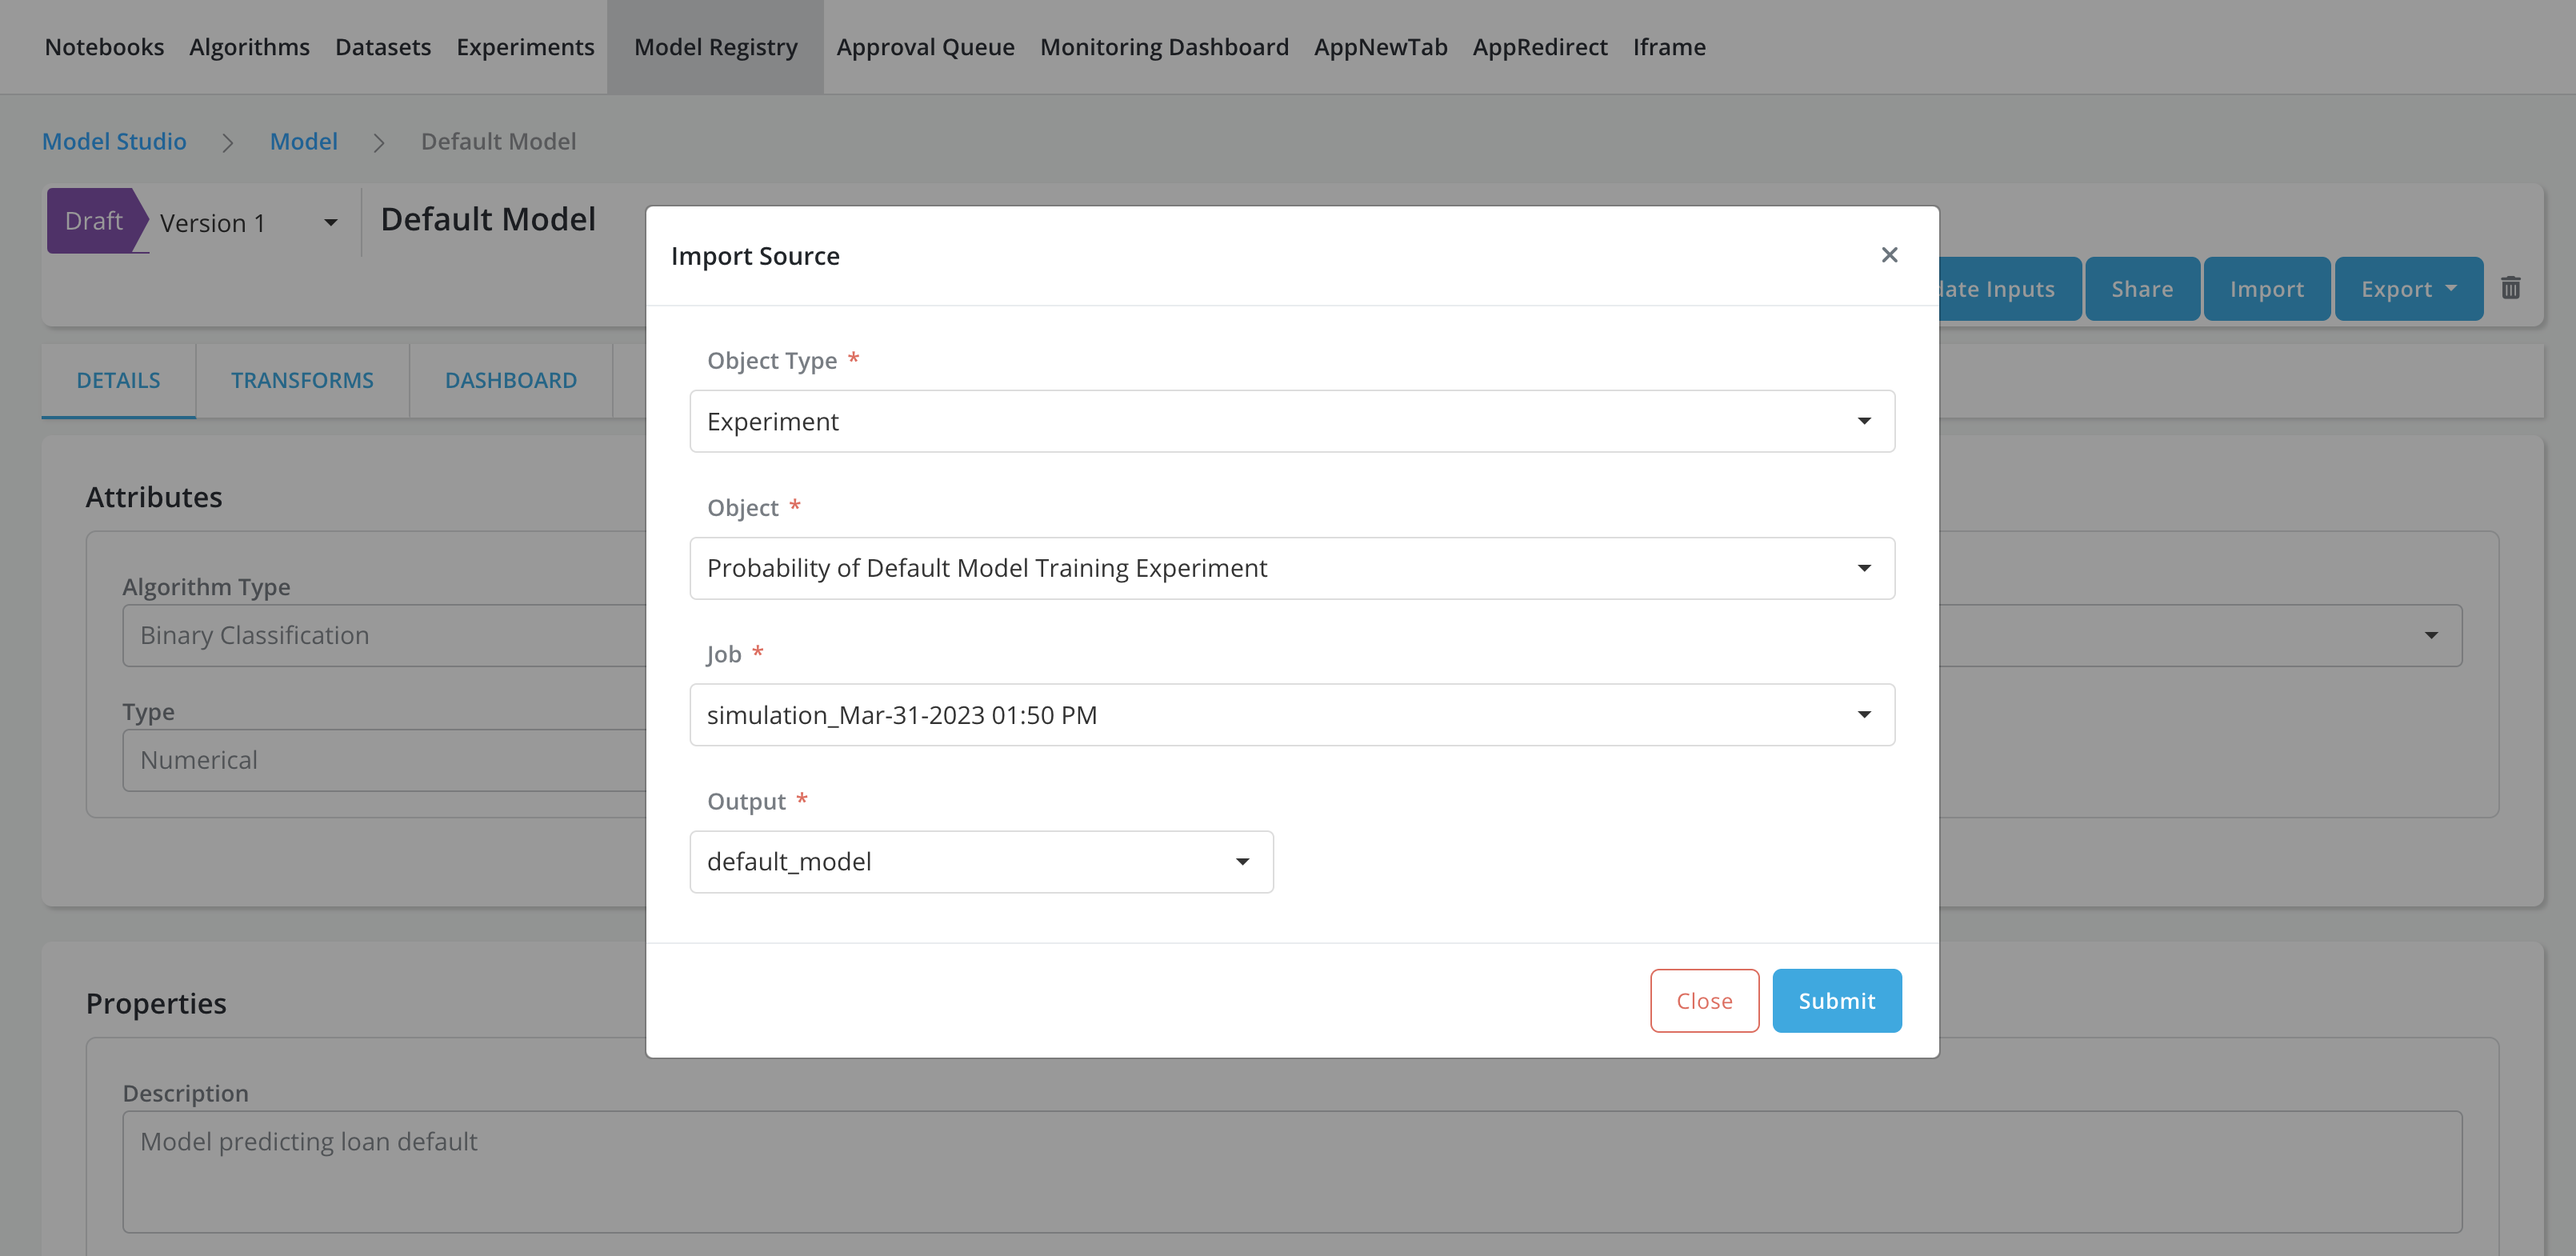
Import Model
-
Click on the Model Registry tab within the Model Studio application
-
Click on the model to be updated
-
Click on Import button on the top right corner of the model details page
-
Import Source pop-up will be displayed, enter all the information about source object to be imported
-
Object Type: Choose the type of source object. Currently model can be imported from dataset or experiment objects
-
If Object Type is dataset:
- Object: Choose the source object
-
If Object Type is experiment:
-
Object: Choose the source object
-
Job: Choose the job for the source object
-
Output: Choose the output from the job to be used for updating the model definition
-
-
-
Click on Submit button to start the importing process
-
Once the import is complete, the following attributes of the Model will be updated based on the source object. Users can click on the CHANGE HISTORY tab to view the details of the updated attributes.
-
If Object Type is dataset:
-
Entity: Updated using source dataset Platform Entity
-
Dependent: Updated using source dataset Dependent Variable
-
Input: Updated using source dataset Inputs or Independent Variables
-
-
If Object Type is experiment:
-
Entity: Updated using dataset Platform Entity. The dataset is registered in source experiment
-
Dependent: Updated using dataset Dependent Variable. The dataset is registered in source experiment
-
Input: Updated using dataset Independent Variables. The dataset is registered in source experiment
-
Model Input Type: Updated using Model Input Type for the algorithm output. The algorithm is registered in source experiment
-
Model File: Updated using the selected output from the source experiment job
-
Training and Validation Data: Updated using the data provided for running the source experiment job
-
Please select the correct Output Field and click on Test Syntax to ensure model definition is imported correctly
-
-