Registering a Policy
Overview
The Policy Registry tool allows users to register an underwriting policy. Registering a policy means describing it, specifying the model inputs including if necessary, an evaluation framework, designing the strategies to execute within the policy, performing at least one simulation of the policy outcome, requesting and getting approval for the policy.
Where is this done?
Policy Registry is done using one of the policy modules (Underwriting for policies that make underwriting decisions, Prospecting for policies that make marketing decisions and Customer Management for policies that customer management decisions)
How to register a Policy
Process Flow
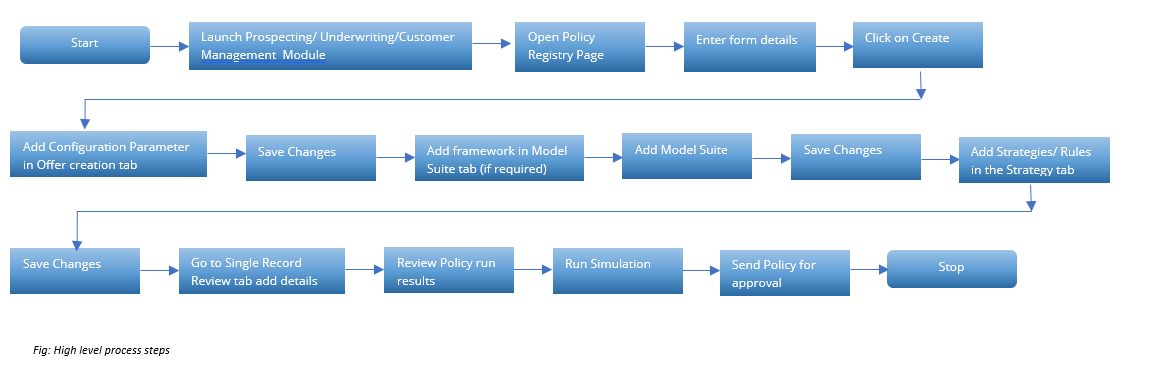
Create a New Policy
-
Click on the Policy Registry tab within one of the policy modules (e.g., Underwriting). The landing page of the Policy Registry tab is a dictionary that displays all the Policies that have been registered within the platform.
The dictionary includes: -
All Policies regardless of their status (draft, pending approval, approved, rejected, shadow and active).
-
All versions for each Policy.
-
Click on the Create button on the top right of the screen to create a new policy

-
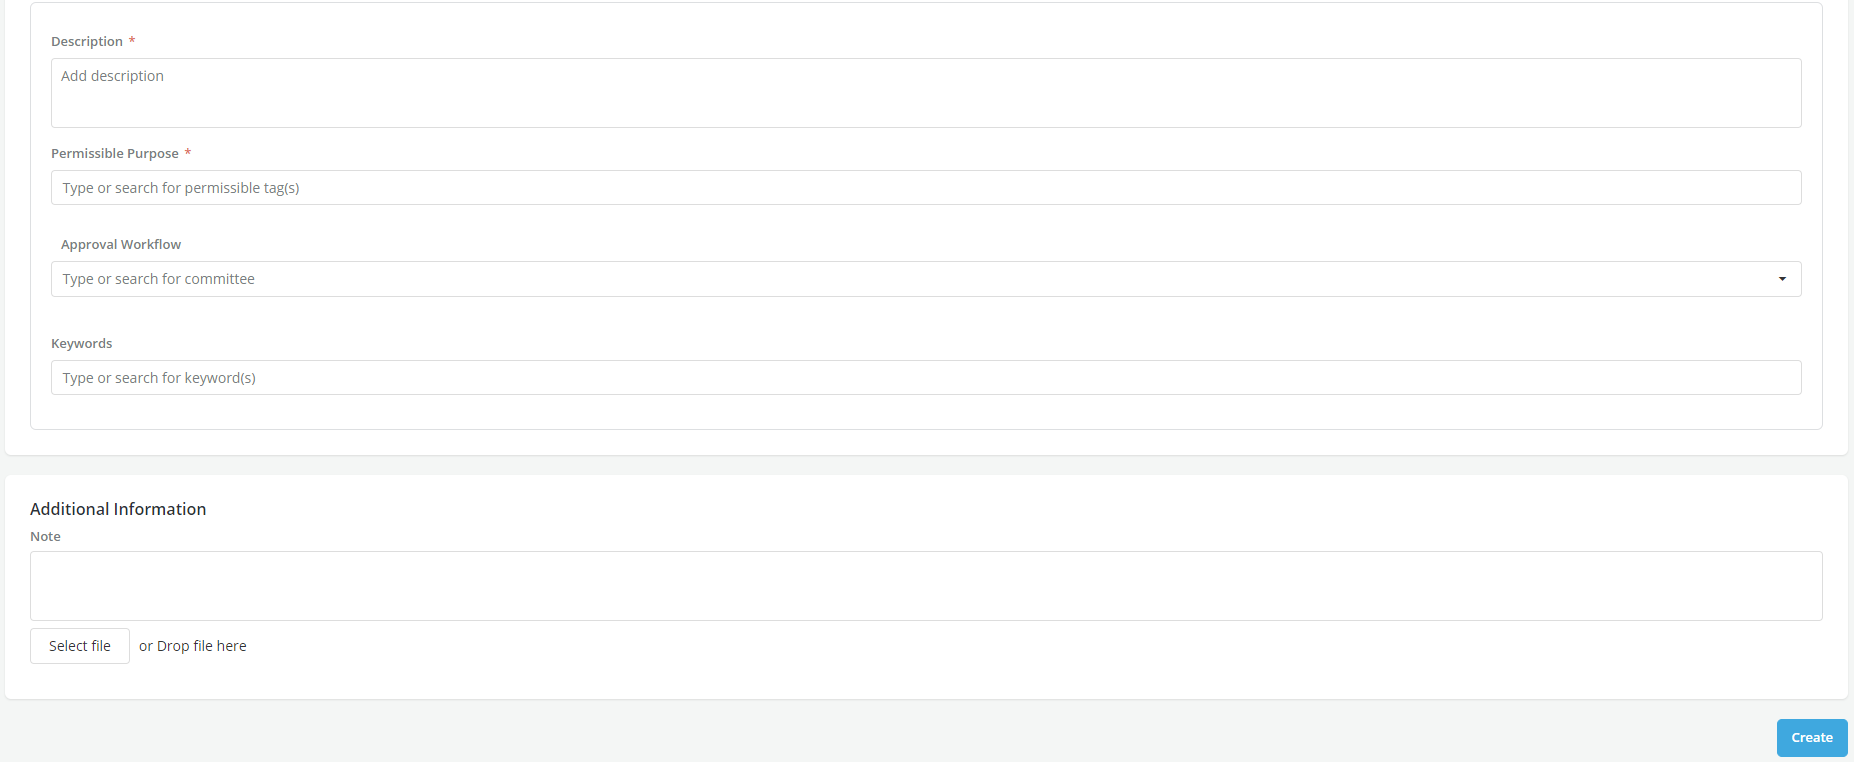
A New Policy page will be displayed, enter all the information about the policy in all the tabs. In Policy Details tab: Enter the following details:
-
Policy Name: Enter the name of the policy that needs to be registered in free format and click on ✔
-
Product: Policies are product specific. Select the appropriate product. A drop-down menu of all the approved products registered in the Product & Framework module of the platform will appear here
-
Entity: Select the entity which enables to select the PlatformEntity required to make the decision at the time of registering the policy.
-
Enter Description, Permissible purpose, Approval Workflow Keywords and Additional Information
-
-
Click on Create. A pop-up message is displayed for the successful creation of the Policy

-
Click on the Save button to save the progress in the policy details section. User can continue to make changes either in this tab or the other tabs.
-
To stop editing the policy, click on the Stop Editing button. Any information captured without saving will be lost.

-
To continue editing a policy in Draft Mode click on the Edit button on the top right of the screen
-
To delete policy in Draft Mode click on the bin icon on the top right of the screen.

Info
To add Offers, Models, Framework to the Policy, open the policy in Edit Mode.
Offer Creation
Here all the possible offers are configured in the policy. Refer Offer Creation section for offer creation and offer display logic details.
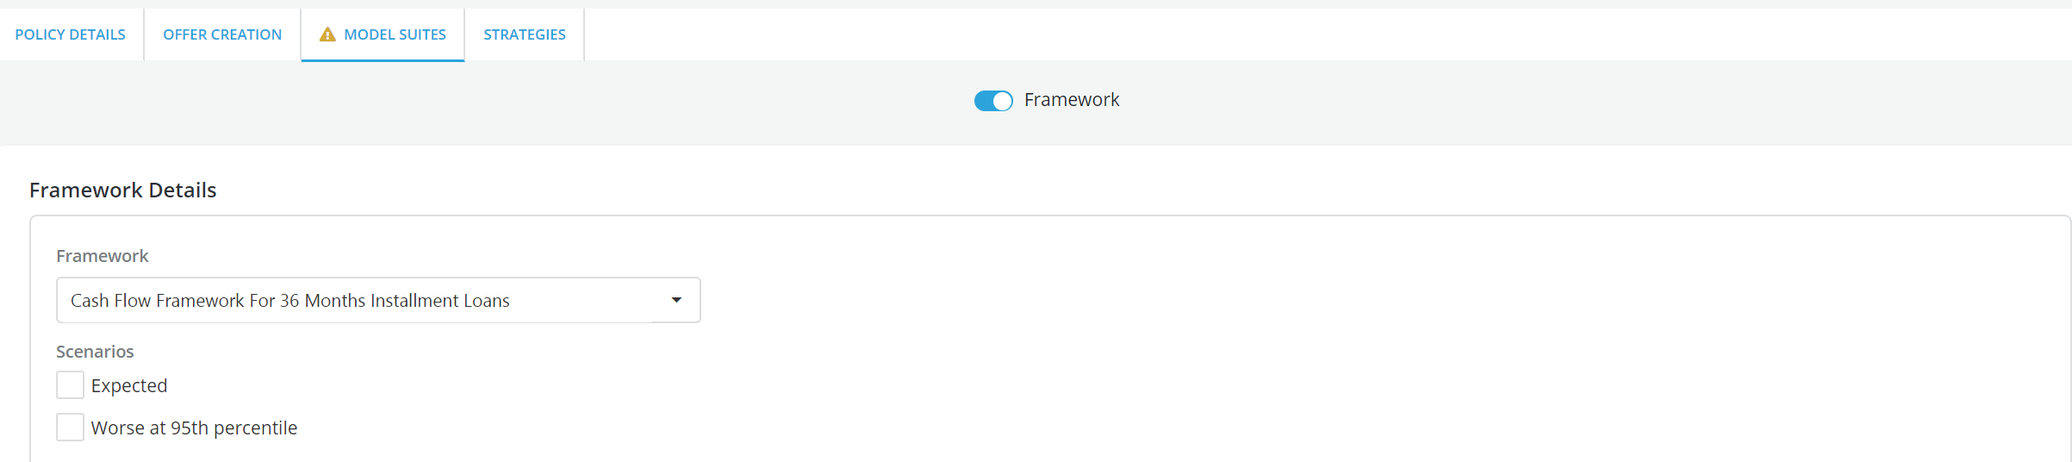
Model Suites
Model Suites are groups of models that a user needs to execute policy. These models may be needed either for input to a loan valuation framework or for direct use as rule inputs. For instance, a user may have created a default probability model and a prepayment model that is used as input to the loan valuation framework which calculates return for a loan. Only the models that have been registered within the platform can be included in model suites.
Framework toggle
- Specify whether the policy will use a loan valuation framework or not by switching on the Framework toggle.

-
Framework Details: If the framework toggle is set to ON then the framework that has been attached to the selected product will appear in an expandable tab. Open the Framework tab and select the framework execution scenario(s) and the basic input variables that correspond to them (input models are added on the next step by adding a model suite).
-
Scenarios: These are the possible scenarios under which the framework can be executed. Examples of scenarios are Expected, Worst Case, etc. Framework Scenarios are defined at the time of Framework creation in the Product and Framework module. Users can select multiple scenarios to run during the framework execution process
-
Basic Inputs: These are inputs needed to execute the framework. For instance, an installment loan valuation framework requires at least three inputs to run: a loan amount, an interest rate and a loan term. These inputs are what is required to define and configure the product that the framework applies to. To specify a basic input:
-
Click on the input field, select among the data elements, features and models the variable that will provide the input value to the selected basic input.
-
When doing optimization, the basic inputs should be mapped to the iteration variables that are all prefixed with potential (e.g. potential_loan_amount). These variables are system generated variables; they are not mapped or derived from any data element. They are used during the iteration process to generate possible values of the basic inputs.
-
Once the basic inputs are specified, click on Save to save the specification before moving to the next steps. To stop editing the policy, scroll up and click on the Stop Editing button. Any information entered without saving will be lost.
-

- Add Model Suite: To add a model suite click on + Add Model Suite, an expandable Model Suite tab will appear. Edit the tab’s title to give the model suite a custom name and choose the model from the drop down list
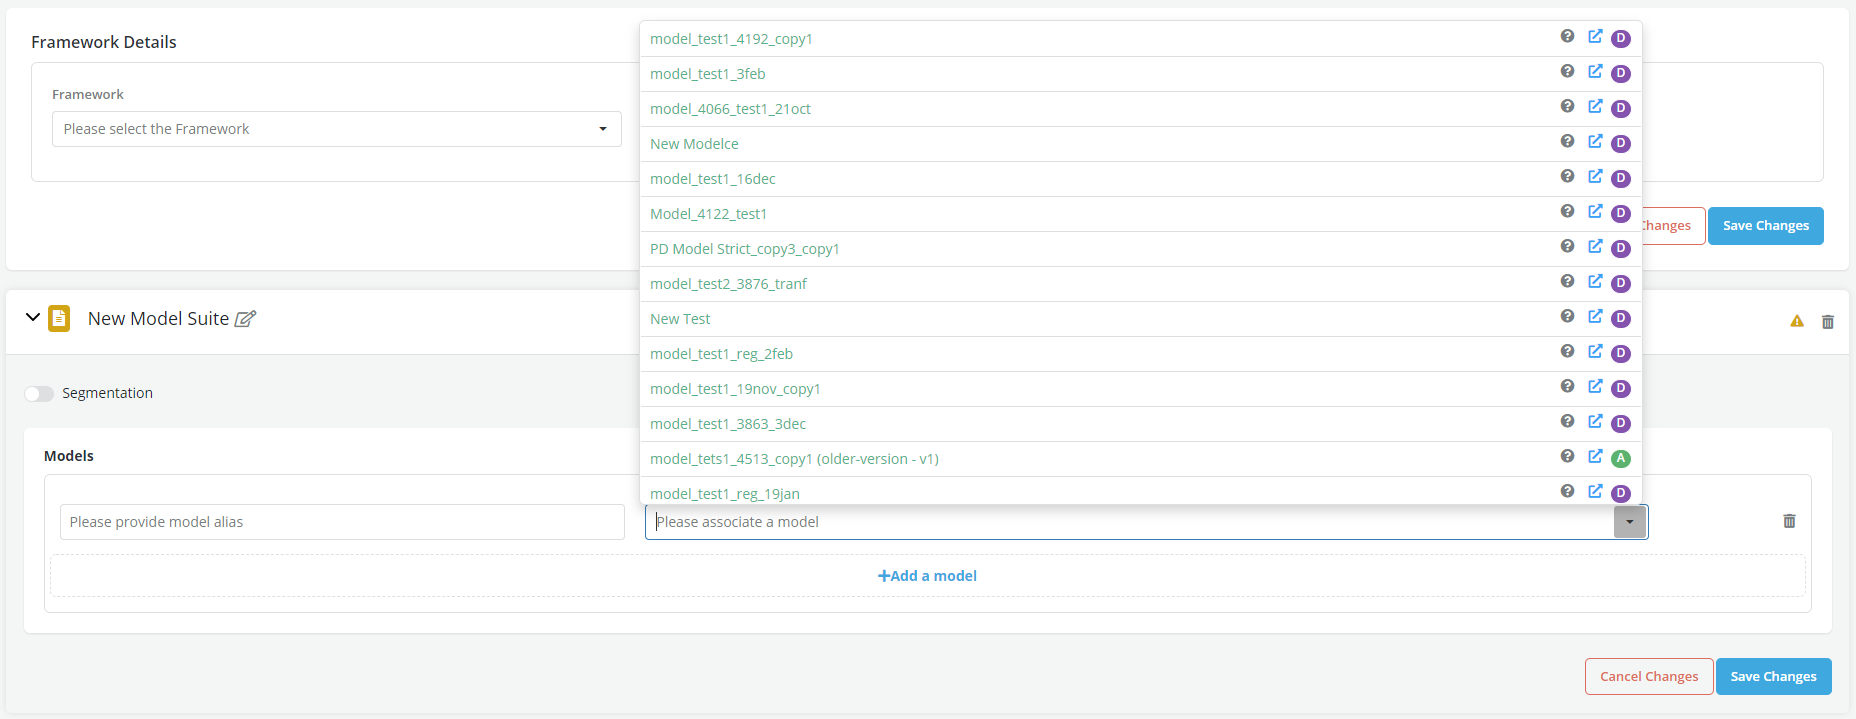
Models
Models are of two categories:
-
Framework Input Models: Mandatory models, if the user has elected to use a framework by switching the framework toggle ON, the input box for these models will appear as soon as the user elects to use a Framework during the policy execution. Each of these input models is mandatory.
-
Non-Framework Input Models: All other models that are not required by the framework but that the user elects to use in one or many rules within the policy.
-
Save Model Suite: Once all models have been specified, click on the Save button to save the configuration and complete the Model Suites set up. You can now continue to make changes either in this tab or in policy details and/or strategies tab having your previous work saved. To stop editing the policy, click on the Stop Editing button. Any information inputted without saving will be lost.
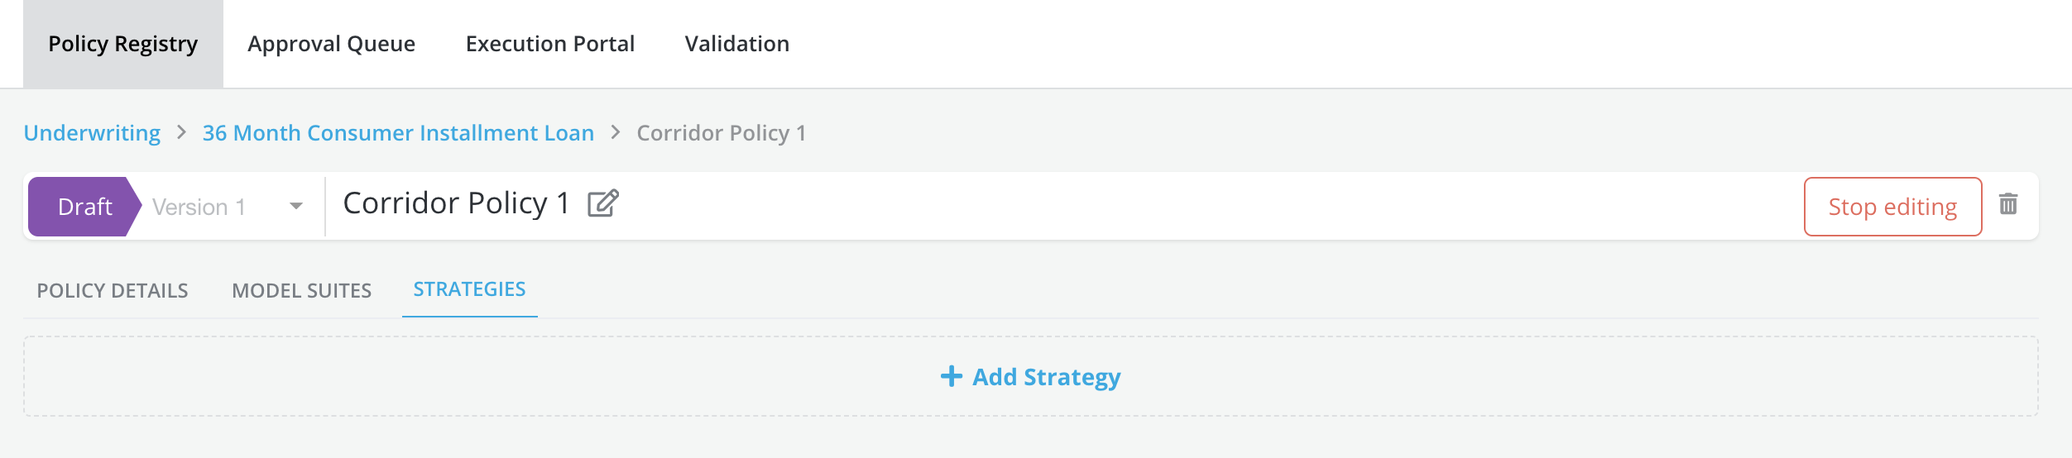
Strategies
Once the model suite(s) are specified, the user can proceed to create strategies. Strategies are a set of rules and/or optimization processes that result in decisions. The platform allows users to specify three types of strategies:
-
Rule-based Strategies: These strategies are created using rules that result in a PASS or FAIL decision (e.g. Approve or Decline)
-
Action Strategies: These strategies are created using rules that result in an action (e.g. Pend for Review, Request additional information, etc.)
-
Optimization Strategies: These strategies are created by specifying an objective function or Target metric (e.g. Expected Return) setting a goal (e.g. Equal, Minimize or Maximize) and in the case of Equal specifying the value that we want the target metric to equate.
-
Strategy can be written following below-mentioned steps:
- Select Strategy Type
- Define Segments (if any)
- Write Segmentation Rules
- Select Rule Type
- Write Rules for each Segment
Creating the Strategy
- Click on the + Add Strategy link
-
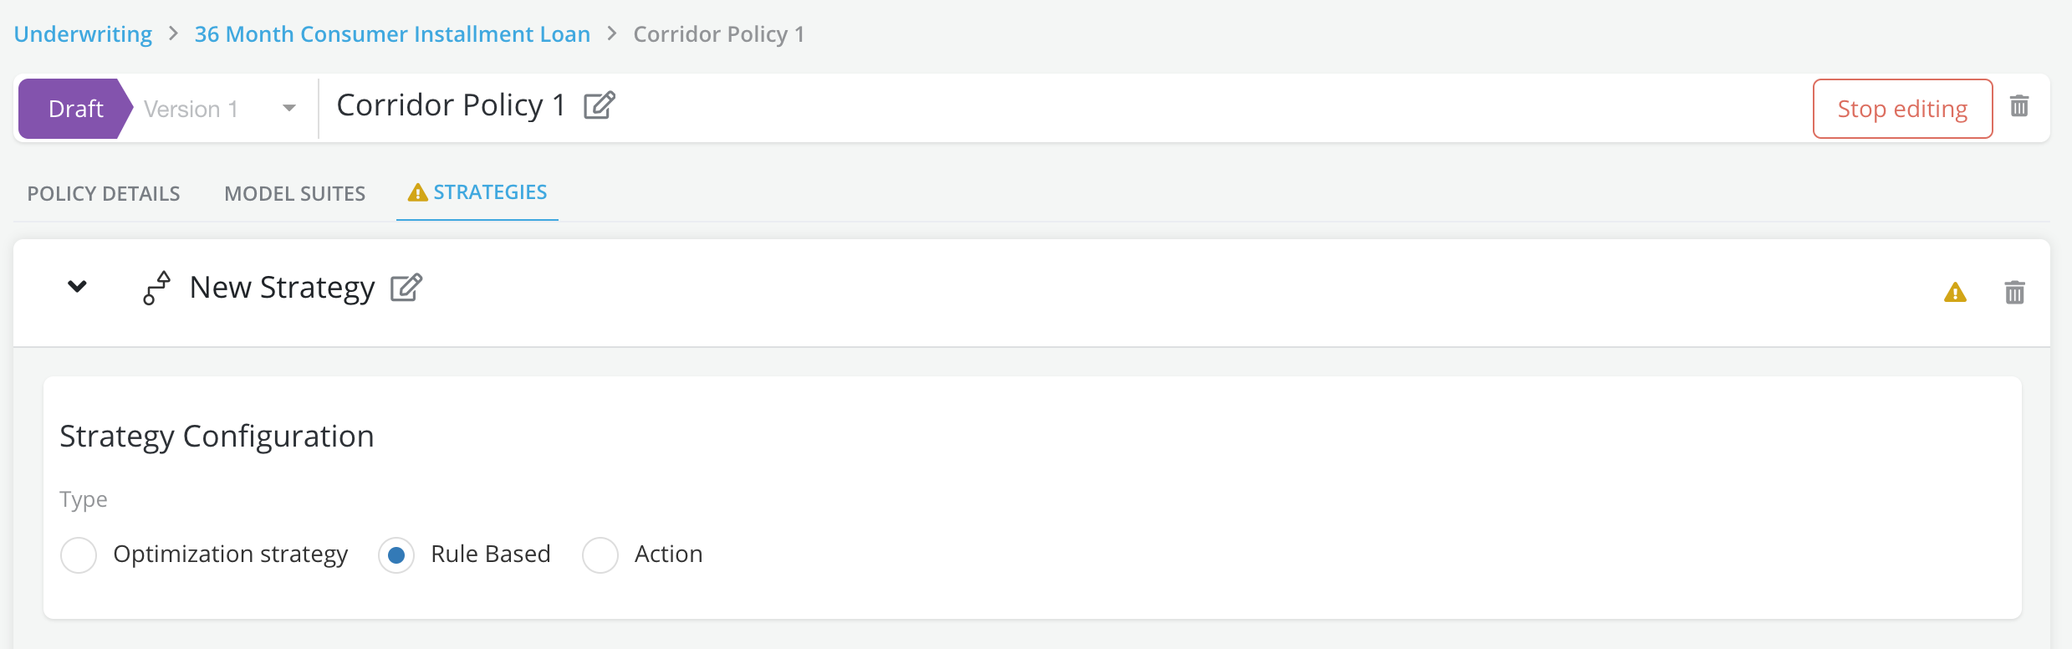
Edit the title of the expandable tab > that appears in order to assign a custom name to the strategy.
-
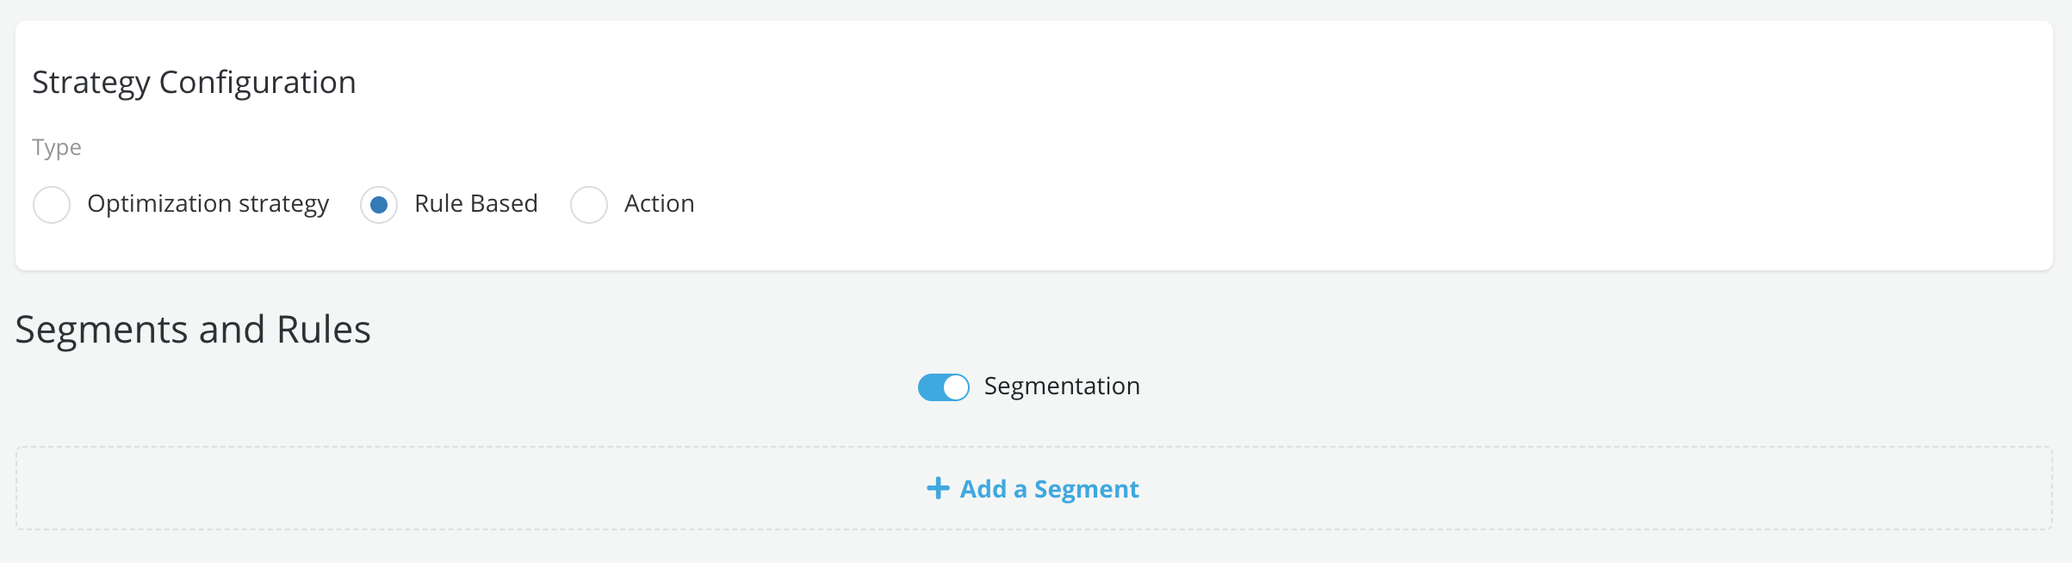
Under Strategy Configuration, choose the Strategy Type (Default is Rule-Based)
- If the strategy contains segment-specific criteria then switch the Segmentation toggle ON else leave the Segmentation toggle at OFF. Rules or optimization criteria will apply to all applications that get evaluated by the strategy in case Segmentation is put at OFF
-
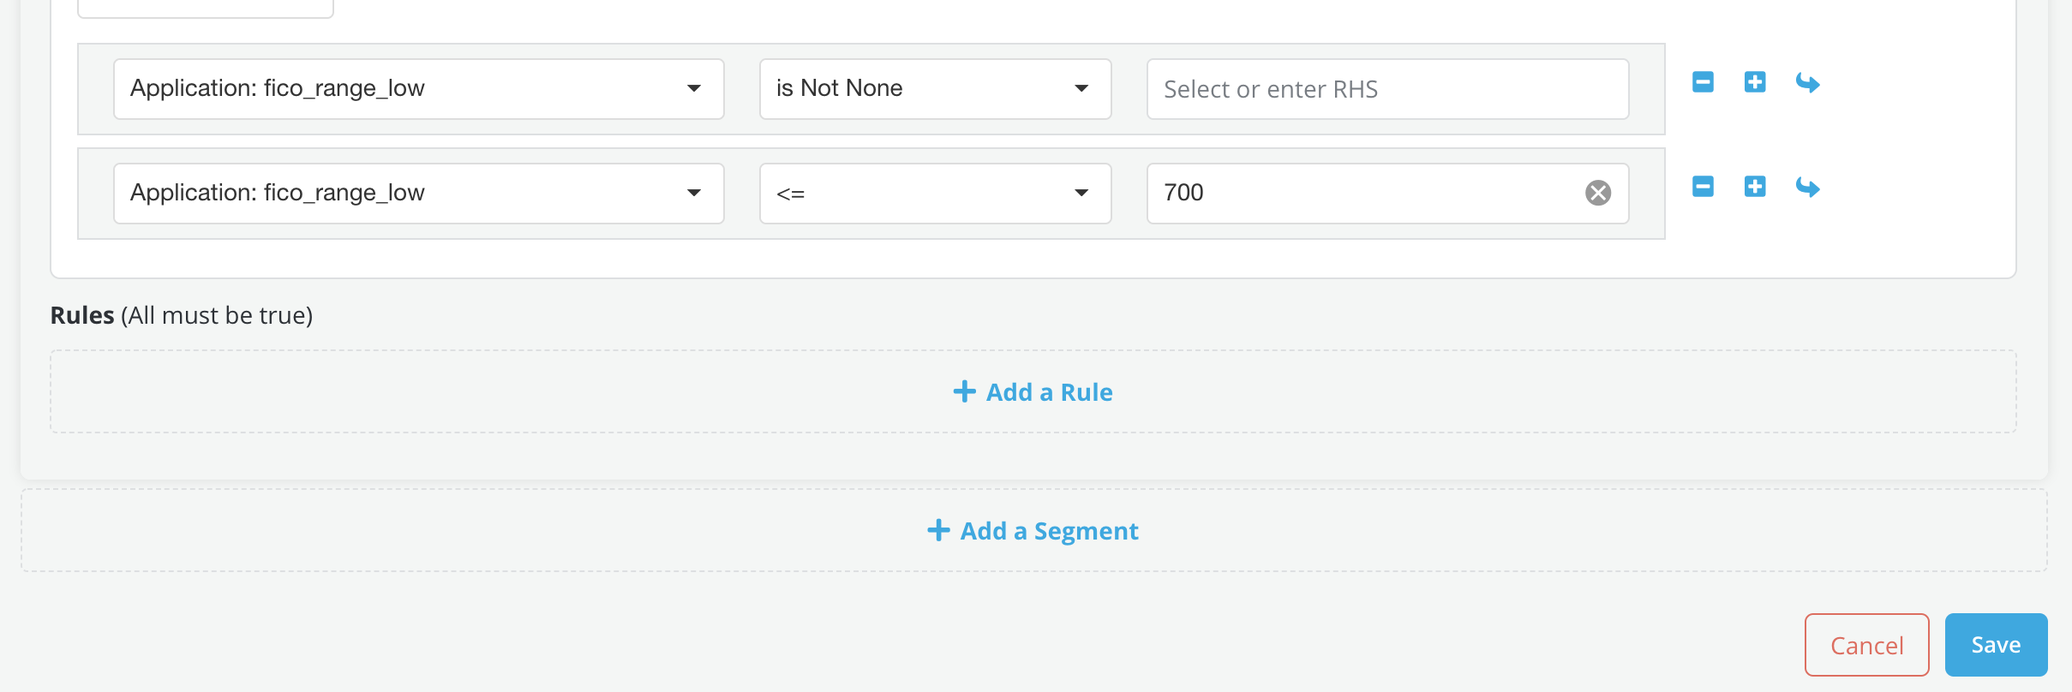
Segmentation criteria: If the toggle is ON then the User will be prompted to specify a segment-first before writing a rule or an optimization criterion. Below are the steps to create a segment:
-
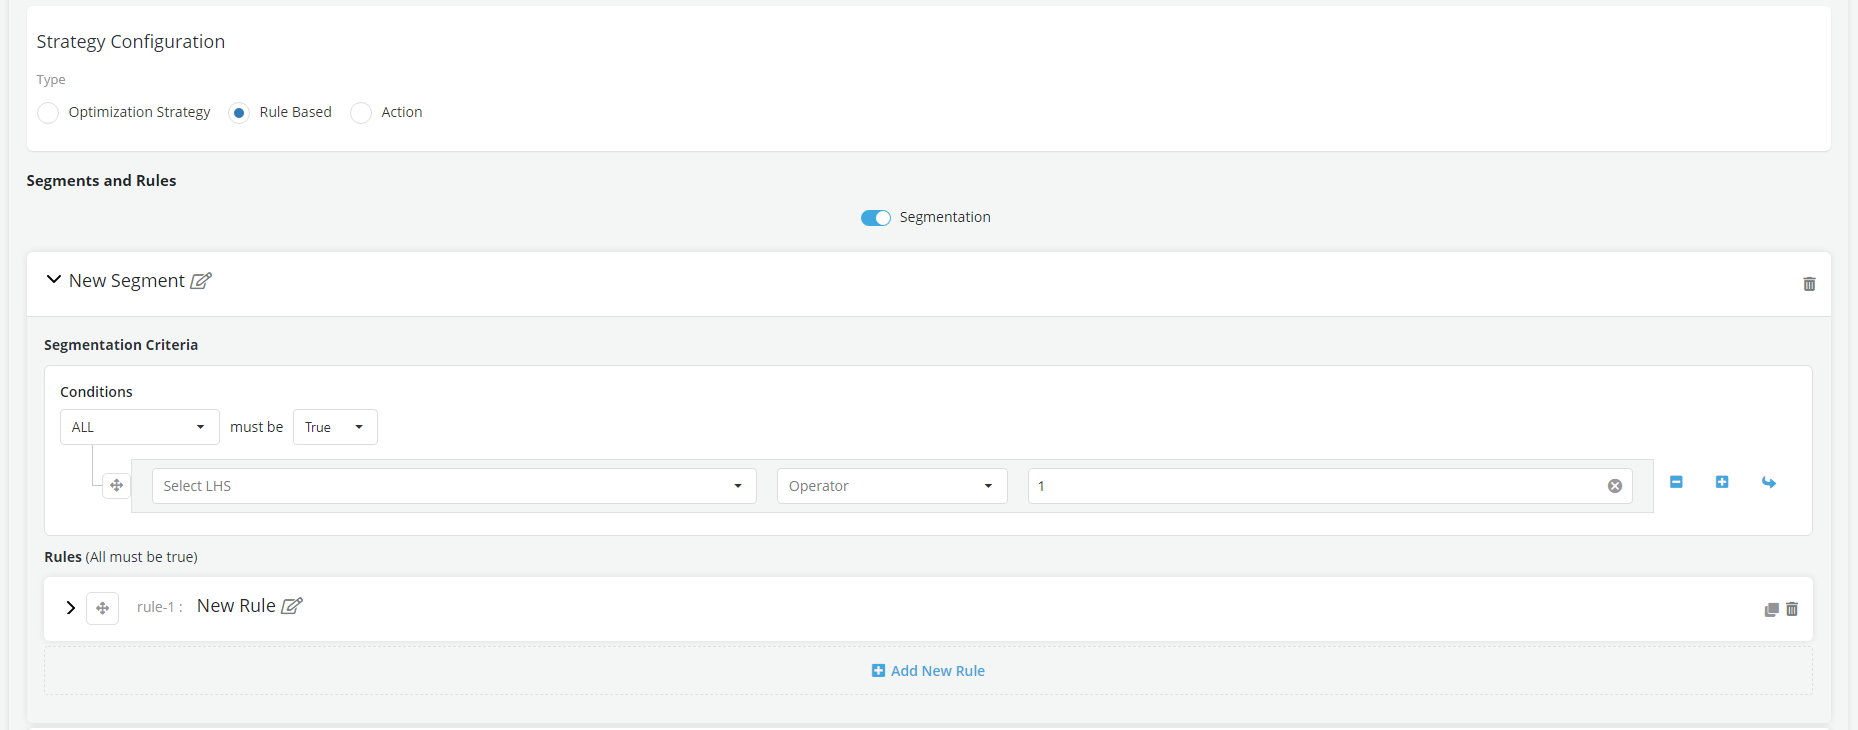
Click on the +Add a Segment
-
Edit the name of the expandable tab that appears and give a custom name to it.
-
Expand the segment tab and enter the segment’s criteria using rules. (Refer to Writing a Rule section below to create a rule). Adding the criterion 'Variable_X' 'is not None' is a good practice to avoid errors caused by missing data. Please note that the platform works sequentially so this rule should be added before any other rule that includes this variable
-
Once a segment has been created, proceed to create the strategy rules or strategy optimization logic that apply to the segment.
-
Write the Rules
-
Once all strategies have been created, click the Save button on the bottom right of the screen to save the specifications.
Writing complex rule structures (rule in rule)
The platform allows users to use previously created policy components (rules, segments and strategies) as inputs to other components of the same policy.
For instance if a Policy contains
Rule1: FICO > 660
Then another rule can be written within the same policy by referencing Rule1 as follows:
Rule2: Rule1 == True AND Income>10000
Similarly, segments and strategies that have already been defined can also be used as inputs to new rules within the same strategy or a New strategy.
The following specifications apply:
- Strategies, rules and segments are automatically assigned numbers to make it easy for users to know from what portion of the policy the component being referenced is coming from

- Within the rule input list all previously created and saved components of the policy will all be listed

- Within the rule input list a policy component will be identified by it’s number and name (e.g., Rule1.2.3 FICO Cutoff)

- When deleting a component that is an input to another component, users are given warnings about dependencies

- When a component is edited and saved, all changes propagate to other components that are using it downstream

- Components of one policy cannot currently be used in another policy.