Corridor Platforms Quickstarter
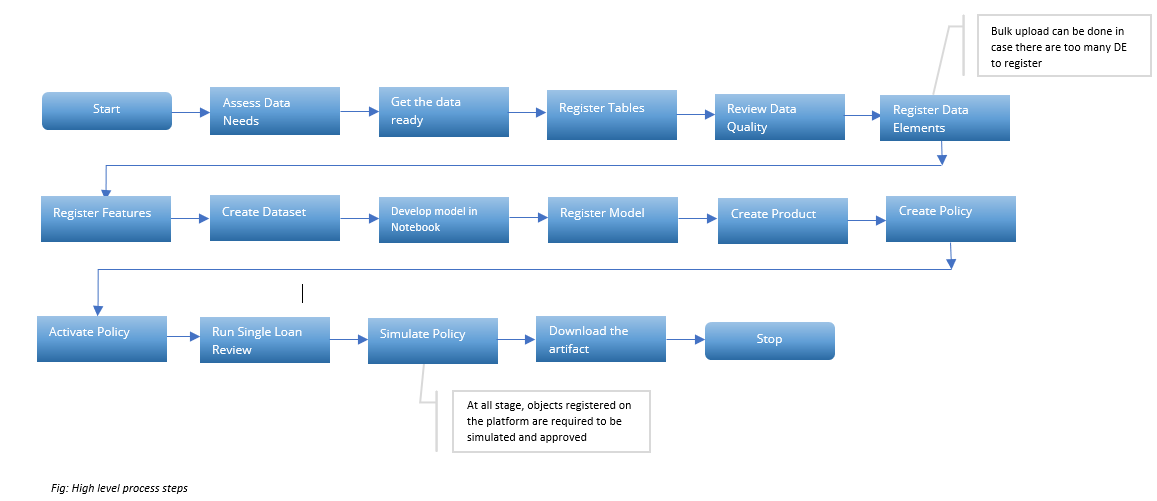
This is a step-by-step walkthrough on how to implement your first use case on the platform. Please refer to the “Key Things To Know” document if you encounter any term that you do not understand.
Step 1: Exposing Your Data To The Platform
Assessing Your Data Needs
Figure out what your ultimate goal is: Creating a Policy, Registering a Model, Building a Model, Registering Features or Registering Data Elements?
-
List out the information (data) needed to create the object that you are trying to create. For instance:
-
List out all the raw variables, features, models, product information and rules that together will be used in your policy.
-
For each of the components of your policy list out all the information needed to generate them. For instance, if your policy uses a model you should also list out all the inputs to the model.
-
For each calculated variable make sure you have access to the calculation formula if you want to reproduce it using the Platform
-
-
Assess how much history is needed to either create your variables or assess the effectiveness of your policy. For instance:
-
If one of your variables uses the last twelve months of payments then you would need at least 12 months of history
-
If you are building a model that predicts the default probability within the next 18 months then you will need at least 18 months of history
-
If you want to look at how your policy would have affected approval rates in the last two years then you need at least 24 months of history
-
Getting the Data Ready
This process is currently manual but will be done through a UI in upcoming versions
- Assign your data to one of the four entities currently supported by the platform (for more information on entities, see “Key Things to Know Before Getting Started”). It’s critical when making this classification to think about the customer lifecycle which dictates chronologically when information gets collected or produced.
Prospect Data: Data collected or produced when evaluating a prospect
Application Data: Data collected or produced when evaluating an application
Accounts Data: Data collected or produced when evaluating an Account
Customer Data: Data collected or produced when evaluating an existing customer (i.e., someone who already holds a product)
-
Create separate data tables for each of the four entities listed above
-
You can have multiple tables for each entity
-
Each table should have an entity ID (e.g., Application ID for Application tables)
-
A table can have non-unique entity IDs (e.g., a monthly loan performance table would have several occurrences of the same Account ID corresponding to each observation month). This is referred to as Detail Table.
-
-
Map Entity Association tables to enable lifecycle connections (this is recommended but not mandatory):
-
Prospect-To-Application table: A table that contains all Prospect IDs and their corresponding Application IDs (if any)
-
Application-To-Account table: A table that contains all Application IDs and their corresponding Account IDs (if any)
-
Account-To-Customer table: A table that contains all Prospect IDs and their corresponding Customer IDs
-
Register the tables
-
Put your table in parquet format and store them in your data lake (most likely s3)
-
Go to Table Registry under Data Vault and register your tables by providing the following information:
-
Table Name (e.g., app_data)
-
Table Location (e.g., s3://dir1/dir2/app_data.parquet)
-
Table Type: cleansed(ready to use) or raw(to be exposed only in Notebook and Data Quality)
-
-
-
Specify the IDs for each table
Review Data Quality
We recommend using the Quality functionality under Data Vault to run a basic quality check on your data and make sure the fields you intend to use are being read correctly
Note: running data quality on all fields at once might take time depending on the number of fields in your table
To run a Quality Check Procedure:
-
Go to Data Vault and click on Quality
-
Click on Create
-
Select the Table that you want to run a Quality procedure on
-
Add rules (optional)
-
Click on Run Simulation
-
Once the simulation is completed you can review every field and validate its content. You can, later on, refer back to these simulation results when writing code or performing analytics.
Step 2: Creating Data Element, Features and Models
Registering Data Elements
Start registering the Data Elements that you would need to create objects downstream. To do so:
-
Go to Data Vault and click on Data Element Registry
-
Click on Create
-
Fill in the registration details
-
Remember to select the entity that you want to allocate the data Element to
-
Click on aggregate if you will be using multiple columns to create your Data Element
-
-
Write the definition of your Data Element:
-
If this is a simple Data Element just select the field that you want to map it to from the source table that you want to read it from
-
If this is an aggregated Data Element select the columns that you want to aggregate and write the aggregation formula in the definition box
-
-
Simulate your new Data element after saving the definition
-
Once satisfied with the simulation results request approval
-
Once approved your Data Element will be available to use everywhere in the platform
Note
You can also do a Bulk Upload if you have too many Data Elements to register.
Registering Features
Features are calculated variables that use as input either approved Data Elements or other approved Features
-
Go to Feature Engineering
-
Click on Create
-
Fill in the registration details (remember to select the entity)
-
Write the definition of the Feature
-
Preview or Simulate your new Feature after saving the definition
-
Once satisfied with the simulation results request approval
-
Once approved your Feature will be available to use everywhere in the platform
Creating Datasets
Skip this step if you do not want to build a model using the platform
You can use this capability to create a modeling dataset using the Data Elements and Feature that you have created. To do so:
-
Go to Model Studio
-
Click on Datasets
-
Click on Create
-
Fill in the Dataset details including the list of independents and the dependents
-
Simulate your dataset
-
If a simulation is completed successfully, the Dataset will be available for you to start running Experiments
Creating Experiments
Skip this step if you do not want to build a model using the platform
You can use this capability to build a model within the platform using a previously created Dataset. To do so:
-
Go to Model Studio
-
Click on Experiments
-
Click on Create
-
Fill the Experiment details
-
Select the Dataset that you want to use for your Experiment
-
Select the algorithm that you want to use for your Experiment (Edit parameters as needed)
-
Run Simulation
-
If a simulation is completed successfully, the results of your simulation will be displayed when you click on the Experiment’s Dashboard
-
You can download the model artifact as a pickle file located in the Experiments Detail tab
Registering Models
If you have created a model, either internally using Datasets and Experiments externally, you can register for use in the platform by following these steps:
-
Go to Model Studio
-
Click on Model Registry
-
Click on Create
-
Fill the Model details (including the entity and the dependent)
-
Specify the model input fields
-
Upload the model definition
-
Run Simulation
-
If a simulation is completed successfully, the results of your simulation will be displayed when you click on the Model’s Dashboard
-
Once satisfied with the simulation results you can request approval
-
Once approved the model will be available to use in the platform
Step 3: Creating Policies
Creating Products
Policies are created for a specific product. So in order to create a policy, we need to first create a product. You can do so by following these steps:
-
Go to Product and Frameworks
-
Click on Product
-
Click on Create
-
Fill in the details of the product
-
Provide the product configuration
-
If you have a framework and wants to use it for this product you specify so
-
Request Approval
-
Once approved, your product will be available to create policies for.
Registering Frameworks
You can skip this step if you are not using an analytical framework in your policy
If, in addition to the Data elements, Features and Models that you have created, your policy requires some additional analytical calculations, you can register these calculations as a framework by going through the following steps:
-
Go to Product and Frameworks
-
Click on Frameworks
-
Click on Create
-
Fill in the details of the framework (including Product Type)
-
Specify the framework inputs
-
Enter the framework calculations in the definition box
-
Specify the framework outputs that you want to use in your decisions
-
Specify the metrics that you want to create from the framework outputs (if any)
-
Specify the valuation functions that you want to create from the framework outputs (if any)
-
Request approval for the framework
-
Once approved, the framework will become available for use by any Product that belongs to the selected Product Type.
Creating Policies
At this stage, you are ready to create decision policies using all the objects that you have registered into the platform (Data Element, Features, Models, Product and Frameworks).
As a first step you need to identify the module to use:
-
For Prospect decisions use the Prospecting module.
-
For Application decisions use the Underwriting module.
-
For Loan decisions use the Loan Investment module.
-
For Customer decisions use the Customer Management module.
Once the right module is selected, you can create a policy by following these steps:
-
Fill in the Policy Description in the details tab
-
Specify the suite of models that you want to use in the Model Suite tab
-
Create the strategies that comprise your policy - You can specify different strategies for different segments if need be.
-
Simulate the policy
-
Request approval once satisfied with the simulation results
Activating Policies
Once a policy is approved it can be activated at any time using the execution portal. To do so, please follow these steps:
-
Go to the Execution Portal
-
Select Activation
-
Select the Product for which you want to activate a policy
- Select and activate the policy or policies that you want to use